Getting Started Category

Google Business Profile

How to Connect Your Google My Business (GM)

Quick Start Guides

LeadConnector Mobile

Managing Conversations

The Marketing Area

Managing Payments

Reputation Management

Payments Category

How To Set Up A PayPal Integration

Lorem ipsum dolor sit amet, consectetur adipisicing elit. Optio, neque qui velit. Magni dolorum quidem ipsam eligendi, totam, facilis laudantium cum accusamus ullam voluptatibus commodi numquam, error, est. Ea, consequatur.

What is listed on the Subscriptions page?

In this article, we will cover the subscription tab and how it works

Please head into Payments > Then click on Subscriptions 

Please Note:

Only subscriptions created via funnel version 2 order forms are listed on the subscriptions page.  
The ability to cancel subscriptions/initiate refunds will be added soon to manage subscriptions without heading to Stripe

Covered in this article:


What is listed on the Subscriptions page? 

The list would contain all subscriptions created via 1-step or 2-step order forms in funnels version 2 mentioning: 

  • Payment Provider and Subscription id
  • Customer details
  • Source of subscription creation
  • Date of creation
  • Subscription amount
  • Status of subscription

What is listed in the subscription details?

  • Payment provider details along with details of the source of subscription creation.
  • Subsequent transactions happening in the subscription in case the subscription was created on Stripe


What does the status of the subscription represent?

Status

Stripe

Paypal

Trial

trialing


Active

active

active

Canceled

canceled

canceled

Suspended


suspended

Failed

incomplete_expired


Incomplete

incomplete, past_due

approval pending, approved

Unpaid

unpaid


Expired


expired

We have bucketed the status of the subscription in Stripe and Paypal according to the above mapping. Refer here to know what these status subscriptions mean in Stripe and Paypal


Will these subscription statuses remain in sync with Stripe / Paypal?

  • For Stripe, the subscription status and payments received will remain in sync with what is happening in your Stripe dashboard. For example, if you cancel the subscription on Stripe, it will reflect as Canceled in your subscriptions list as well. All the upcoming payments received will also remain in sync with your Stripe dashboard.

  • The subscription status will not remain in sync if the subscription was created on Paypal. Also, in case the subscription was created on Paypal, the subscription details will as of now not capture the upcoming payments as well. The subscription entry will get created though for you to track the subscriptions that got created via Paypal. 


Will the subscriptions page contain the list of subscriptions that did not get created because of payment failure on the order form?

No, in case the payment failed while making the first payment for the subscription while submitting the order form, it would not get registered on the subscriptions page. You can still track the contact as the contact will get created in both 1-step and 2-step order forms.


What is not contained on the subscriptions page?

  • Recurring templates created in the invoices section

  • Subscriptions created inside the Memberships section
Using Apple Pay and Google Pay

Accepting Apple Pay and Google Pay in your Order Form is a great way to improve the purchase experience for your customers. These payment methods offer convenience, security, and speed that traditional payment methods cannot match.

Covered in this Article:

How to use Apple Pay and Google Pay in the CRM?

How do I enable Apple Pay and Google Pay?

Troubleshooting for Apple Pay

Troubleshooting for Google Pay


FAQ

What will differ in my reporting of transactions and orders?

What is the difference in Stripe pricing for transactions processed through credit cards and Apple/Google Pay?

I’m using PayPal as my payment provider instead of Stripe. Can I provide Apple Pay and Google Pay to my customers?

Can I enable other payment methods like Bank redirects and ACH as well?

How do I disable the other payment methods option after enabling them once?


How to use Apple Pay and Google Pay in the CRM?

Stripe lets you add Apple Pay and Google Pay as payment options under the “Other” tab on one-step and two-step order forms. Upsells will also work with Apple Pay/Google Pay.

Enabling this option will allow Sub Accounts to enable Apple Pay/Google Pay as a payment method along with the default method of credit card and PayPal (PayPal only shows up if PayPal is enabled under Payments ➝ Integrations)

Your customers will see Apple Pay and Google pay based on their geographic location and the web browser of the end customer. They will be able to use it based on whether or not they have a payment method associated with their Google account/Apple account. Only if both these conditions apply Google Pay/Apple Pay will be visible for payment along with the default choice for a credit card.

Countries and Regions that Support Apple Pay
Countries that Support Google Pay

Currently, supported browsers include Chrome Desktop, Chrome Android, macOS Safari, iOS Safari, and Microsoft Edge for Windows.

Please Note:

This capability only works with Version 2 Funnels. 

A view of how the Apple Pay icon will appear in an order form once enabled.


A view of what appears when a client clicks on Apple Pay in an Order Form.

A view of how the Google Pay icon will appear in an order form once enabled.

A view of what appears when a client clicks on Google Pay in an Order Form.

Please note:

There might be a case that the browser is not up to date, Apple Pay and Google Pay are not supported in the customer's country or a relevant credit card has not been added to the customer's  Apple/Google account. No option to pay via Apple Pay or Google pay will appear under the "Other payment methods" tab in that case. But the customer will still be able to see the credit card option to pay for the order rather than changing the tab again

How do I enable Apple Pay and Google Pay?

Using Stripe Connect under the Payments ➝ Integrations page is the primary requirement. If you’re using Stripe APIs to connect to Stripe, please use Stripe Connect to use this feature. Once you have connected your Stripe account in Payments> Integrations, a toggle is provided to enable Apple Pay and Google Pay on the order forms. 


Troubleshooting for Apple Pay

1. The toggle to enable Apple Pay and Google Pay should be turned on while Stripe is connected to the location

2. Make sure that Apple Pay is available in your country

3. Ensure that the domain on which the funnel is hosted is registered with Stripe. This is an additional requirement for Apple Pay and should ideally automatically happen as soon as the toggle is turned on

 a. Head over to your Stripe dashboard on this URL and see if the domain is listed in the Web Domains section

 b. If the domain is not listed here, you can manually add the domain by clicking on Add New Domain. This is only intended for a quick resolution; you should raise a ticket with us if it does not automatically register on turning the toggle.

4. If the domain appears registered, ensure that the domain association file is hosted for that domain. This means that a file should get downloaded upon visiting https://example.com/.well-known/apple-developer-merchantid-domain-association if you’re registering at https://example.com
Click here for more information on this.

5. The browser or the device fulfills the following requirements:

The end customer is on the web in Safari, starting with iOS 10 or macOS Sierra

List of compatible devices with Apple Pay
List of participating banks with Apple Pay


Troubleshooting for Google Pay

1. The toggle to enable Apple Pay and Google Pay should be turned on while Stripe is connected to the location.

2. Make sure that Google Pay is available in your country

3. The customer is using Google Chrome or Safari.

4. The customer has a valid card registered with Google Pay.


FAQ

What will differ in my reporting of transactions and orders?

There will be no change in the reporting or tracking of the transactions and orders. Stripe treats Apple Pay and Google pay payments as card payments. All the purchased orders via Apple Pay or Google pay will be reflected on the Orders/Transactions/Subscriptions page.

What is the difference in Stripe pricing for transactions processed through credit cards and Apple/Google Pay?

There is no difference in the pricing between credit card transactions and Apple Pay/Google Pay transactions. They are charged similarly to credit card transactions. Learn More here about Apple Pay.

I’m using PayPal as my payment provider instead of Stripe. Can I provide Apple Pay and Google Pay to my customers?

No, Apple Pay and Google Pay can be provided as payment methods using Stripe Connect only in funnels version 2

Can I enable other payment methods like Bank redirects and ACH as well?

Currently, only Apple Pay and Google Pay can be enabled using Stripe. Enabling other payment methods as well will be upcoming in Q2/Q3 2023

How do I disable the other payment methods option after enabling them once?

Turning the toggle off for Apple Pay and Google Pay on the Stripe connection card on the Integrations page will disable the “other payment methods” tab on the order form.

How to set up the NMI integration?

NMI (Network Merchants Inc.) is a well-known payment gateway service provider that offers a variety of solutions for businesses to process online transactions securely and efficiently. NMI’s payment gateway allows merchants to accept credit card and eCheck payments from their customers through multiple channels, including websites, mobile apps, and in-person point-of-sale systems.


Covered in this Article:

What does NMI have to offer?

How can I enable payments via NMI?


Enter the required Gateway Id and API keys with NMI:


FAQs

What does NMI have to offer?

Some of the features offered by the NMI payment gateway include the following:

  1. Support for multiple currencies and payment methods: NMI supports various currencies and payment methods, allowing businesses to cater to a global audience.
  2. Tokenization and encryption: NMI’s platform uses tokenization and encryption technologies to ensure that sensitive cardholder information is securely transmitted and stored, minimizing the risk of fraud and data breaches.
  3. Fraud prevention tools: NMI offers various fraud prevention tools, such as Address Verification System (AVS) and Card Verification Value (CVV), to help merchants identify and block potentially fraudulent transactions.
  4. Customizable checkout experience: Merchants can customize the look and feel of their checkout process to match their branding, ensuring a seamless customer experience.
  5. Recurring billing and subscription management: NMI supports recurring billing and subscription management, making it easy for businesses to offer subscription-based products or services.
  6. Integration options: NMI offers a range of integration options, including APIs and pre-built plugins, making it easy to connect the payment gateway to various e-commerce platforms, shopping carts, and other third-party software.
  7. Reporting and analytics: NMI’s platform provides comprehensive reporting and analytics tools that allow merchants to track and analyze transaction data, helping them make informed business decisions.
  8. Customer vault: Merchants can securely store their customers’ payment information in NMI’s customer vault, simplifying the checkout process for returning customers and making it easy to manage recurring payments.

How can I enable payments via NMI?

NMI integration is currently supported for order forms, invoices, and Text2Pay link payments. These steps can enable the integration: 

Enter the required Gateway Id and API keys with NMI:

Three keys are required to be entered to connect to NMI: 

  1. Gateway Id
  2. Security key
  3. Public key


Please follow these instructions to obtain the keys if you do not already have them.


Once you have acquired the keys, please head to Payments> Integrations in your subaccount.

Then fill out the respective fields with their keys and then hit Save:

Please Note:

Please upgrade to funnels version 2 to make use of this feature. 


FAQs

Where can I use the NMI integration to accept payments?

The NMI integration can process order form payments in funnels version 2. This includes one-step and two-step order forms and one-click upsellsinvoice payments can be processed using the NMI integration, and Tex2Pay link payments can be processed using the NMI integration.

Will I be required to create new products for using the integration? How should I sync the products with my payment provider?

Syncing the products is not required at all for using NMI/Authorize.net integration. You are only required to create a product(one-time/recurring) under Payments ➝ Products, and it will work according to the price defined while creating/editing the product.

If existing products are being used with Stripe/Paypal, they will work with Authorize.net or NMI by switching the default provider under Payments ➝ Integrations. No additional sync is required to be done in that case.

What payment methods are supported using NMI? Are Apple Pay, Google Pay, and e-check payment methods supported?

Only credit/debit card payments can be accepted using NMI integration. Currently, you cannot accept Apple Pay, Google Pay, or check payment methods,

Is 3DS supported with the NMI integration? 

NO, 3DS payments are not supported using the integration. 

Can I use Stripe to offer Google Pay and Apple Pay and process credit card payments using NMI/Authorize.net? 

Unfortunately, this cannot be the case. Google Pay and Apple Pay can be provided using Stripe only for now, and only one gateway has to have defaulted for order form payments among Stripe, Authorize.net, or NMI. So using both simultaneously is not possible.

Will recurring purchases be supported with NMI? Where can I find the track of subscriptions and orders placed?

Yes, recurring product purchases are supported using NMI/Authorize.net integration. You can track the subscriptions under Payments ➝ Subscriptions and orders details under the Orders and Transactions table.

Please Note:

Purchase only one recurring product at a time in an order form checkout is supported.

I am already using Stripe. Do I need to disconnect Stripe to connect to NMI?

No, You are not required to disconnect Stripe to connect to NMI. You can connect to both gateways on the integrations page. However, since you have connected two gateways for processing payments, you must define a default gateway for processing order form payments.

What is the meaning of the Default gateway at the top of the Integrations page?

mustWhen you connect to more than one gateway on the Integrations page, you will be required to define a default gateway for processing payments. This is necessary since more than one gateway is eligible to process payments and would require a default choice. One default choice must be made.

Please Note:

PayPal will continue to function alongside Authorize.net/Stripe, whichever is set as the default

Why don’t I see Paypal among the default gateway options?

You can connect to Paypal and use it as a payment method alongside a credit card payment method using Stripe/Authorize.net/NMI. This means that the default must be chosen among Stripe/Authorize.net/NMI when connected. PayPal can be used independently and alongside credit card payment methods on order forms.

I have connected to NMI and have selected it as the default gateway. Will transactions across the application be processed through NMI now?

The NMI integration is available only for invoices, text2pay links, and order form payments. This means that if NMI is connected and is set as the default gateway, only these payments will be processed through NMI. Other payment areas like calendars, SaaS, or memberships will continue to process payments using Stripe. 

Please Note

If there are any recurring subscriptions/pending transactions with Stripe, they will continue to run as is till the time the Stripe connection is in place. We encourage you to keep the connections in place and not disconnect any gateway, defining the default gateway will run new transactions through the desired choice and will keep in place the existing subscriptions running through Stripe and/or PayPal.

What will change in the reporting of transactions done with Authorize.net? Where will I be able to keep track of all payments?

There will be no change in the Orders/Subscriptions/Transactions reporting. All the payments done via NMI/Authorize.net will be available under Payments ➝ Transactions. 

Also, there will be no change in the functioning of triggers/attribution associated with order forms. All the functionalities will work the same.

How do I Cancel/End a subscription created via NMI/Authorize.net? I am not able to do so in the merchant portal.

Subscriptions created using NMI/Authorize.net can be canceled within the Subscriptions page using the ‘Cancel Subscription’ action.

We do not create subscriptions using the Automatic Recurring Billing of NMI/Authorize.net; hence, only charges corresponding to a subscription transaction will be visible in the merchant portal. 

Will I be able to refund transactions as well within the application itself?

No, as of now, we do not have the refund functionality within the application. It would be best if you used the merchant portal for refunding transactions for now.

Where will I be able to find the subscriptions created via NMI? I cannot relate to the subscription status defined on the Subscriptions page.

All subscriptions created on the order forms can be tracked under Payments ➝ Subscriptions. The following represents subscription statuses and their inferences: 

Pending – When the first transaction for the subscription could not be completed, or the transaction is held for review

Trial – Subscription is in trial mode

Active – Last payment was made, and there is an upcoming payment as well

Expired – All the subscription payments have been completed, and the subscription no longer exists

Canceled – The business canceled the subscription using the Cancel action, and no further payments will be processed.

Unpaid – The last payment for the subscription was not paid successfully. The subscription is ongoing, but the final payment was unsuccessful.

The following actions will be provided for the subscriptions according to the status: 

Actions / Status

Pending
Trial
Active
Expired
Canceled
Unpaid
Cancel
No
Yes
Yes
No
No
Yes

The following flow describes the handling of subscription statuses and payment retry logics in case of a subsequent payment failure :

If the first subscription payment is successful while purchasing the subscription on the order form, the subscription will move into the active state. It can also move into the trial status if a trial period is attached to the recurring product. The subscription will remain active until every recurring payment is made successfully for the subscription and will move to “Expired” after the completion of payments.

The payment will be attempted two more times after 24 hrs each. The status will remain “Unpaid.”

The subscription will remain in the Unpaid state and attempt the following subsequent transactions, each with two retries. The next subsequent payment will also be attempted, and if any payment becomes successful, the subscription will move into “Active.” Else will stay with “Unpaid” status.

The subscription status will move to “Expired” after all the retries are made for the last transaction.

If the business disconnected the gateway account and there is an ongoing subscription, the transaction cannot be processed, and hence the subscription will move to unpaid. The retry attempts will continue according to the retry logic.

When will the NMI integration be available for Calendar payments/memberships and other areas?

NMI integration will be available for calendar payments by the end of Q1’23. Other areas like membership,s and SaaS will continue to process payments via Stripe.

Additional resources for reference

Testing cards with NMI

Available currencies for NMI


How to create recurring Invoices

You may have heard of the term “recurring billing/invoicing.” It is a way for your customers to pay you automatically without manually entering their payment details whenever they buy something from you. 

This can be very useful if you sell products on a subscription basis; you may want to send them an invoice every month or so for the amount due in advance.

This article will show you how to set up and use a simple recurring invoice.

Covered in this Article:

What is a recurring invoice?

How to create a recurring invoice?

Understanding Setting invoice frequency.

Status and action types in recurring templates.

View sent invoices and their payment status.


FAQ

What is being shown in the list view?

How can I get notified upon receiving payment on the invoice?

How to stop sending future invoices?

Can I modify the price, discount, or taxes from the following occurrence?

Can I change the frequency setting of an ongoing recurring invoice?

Which products can I add to recurring invoices?


What is a recurring invoice?

A recurring invoice can be scheduled in advance to send automatically to your customers who bought a recurring service/product. You want to schedule the invoices once and forget it! You! 

Please Note:

We recommend using Stripe Connect with Invoices, in the event you do not wish to use Stripe Connect payments would need to manaully record.


How to create a recurring invoice?

  • Open the “Invoices” tab under the payments section.
  • Select “New Recurring Template” by clicking New on the All Invoices or Recurring Templates page.

Understanding Setting invoice frequency.

The below table explains different cases of setting invoice frequency:


  • The first invoice will be due on July 5, 2022
  • The second invoice will be due on July 7, 2022
  • Invoice generation would never stop automatically
  • The first invoice will be due on July 5, 2022
  • The second invoice will be due on July 7, 2022
  • The subsequent invoices would be due on the 9th, 11th, and 13th of July
  • The first invoice will be due on July 5, 2022
  • The second invoice will be due on July 7, 2022
  • The subsequent invoices would be due on the 9th, and 11th of July
  • No invoice will be due on July 12
  • July 5, 2022, is a Tuesday for reference
  • The first invoice will be due on July 18 but has to be sent two days in advance, i.e., July 16, 2022i.e.
  • The second invoice will be due on August 1, 2022, but will be sent two days in advance, i.e., July 30, 2022. i.e.
  • Had July 5 been a Monday, the first invoice would be due on the same date, i.e., July 5, 2022, and would have been sent immediately. have been
  • The second invoice would be due on July 19 and sent out two days in advance, i.e., July 17, 2022i.e.
  • The first invoice will be due on September 2 and would be sent 0 days in advance, i.e., on the same date.
  • The second invoice would be due on November 2 and sent to the customer on the same day.
  • The scheduling will be complete after sending out three invoices to the customer as specified in the settings.
  • If, in the above example, we want to send the first invoice starting from the next month itself but at an interval of 2 months only
  • Simply selecting the start date as August 2 would work for the required logic.
  • The scheduling will be complete after sending out three invoices to the customer as specified in the settings.
  • Settings provide a solution if we want to send out the invoice to the customer on the first Monday of every month starting from the next month.
  • The first invoice will be due on August 1 itself, given that August 1 is the first Monday in August.
  • The invoices will be sent one day in advance.
  • The logic also helps us end the process after the end of the year. This means the last invoice will be due on December 5, the first Monday of December.
  • No further invoices will be due for the customer after December 5.
  • This frequency setting would allow us to send an invoice to the customer on the last date of December every year, i.e., December 31
  • Invoice scheduling will end after sending out five invoices to the customer.


Status and action types in recurring templates.

Action / Status –> DraftActiveScheduledCanceledCompleted
EditYesNoNoNoNo
ViewNoYesYesYesYes
DeleteYesNoYesNo*No*
EndNAYesYesNANA
Please Note:
Cancelled and Completed invoices can be deleted only if no invoice has been sent out to the customer. Deleted recurring templates are not shown in the list view.

View sent invoices and their payment status.

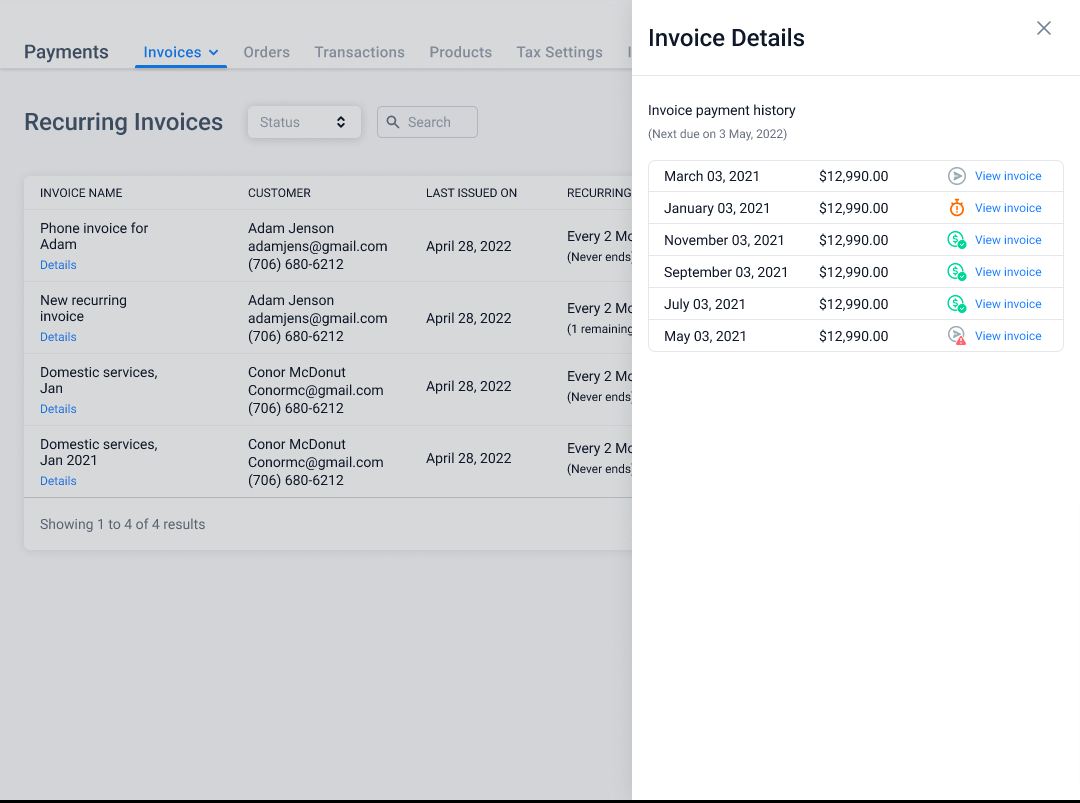
Users can click on Details as shown below to know the invoices sent and their status, which will open the invoices sent and their status as shown in the right panel.


There can be four types of invoices status possible here, which will also be shown in the form of tooltips above the icons:

  • Sent: The invoice was successfully sent to the customer
  • Overdue: The invoice was successfully sent on time but has still not been paid by the customer
  • Paid: The customer has paid for the invoice
  • Not Sent: There was a system error in delivering the invoice to the customer, and the invoice needs to be sent again.

The invoice statuses can also be checked inside the invoice builder once the recurring template is Scheduled, which will open the right panel similarly.

FAQ


What is being shown in the list view?


The list shown on the Recurring Templates page represents the recurring templates created by the user, which are creating and sending individual invoices to the defined customer as per the frequency settings defined in them individually.

For simplicity, the list shows the parent invoice creator, which creates and sends out invoices per the frequency settings and customer details specified inside them. sends


How can I get notified upon receiving payment on the invoice?

The table below shows the default notifications sent to the sender and receiver. The location user can create more such automation based on the invoice status(sent/paid) using invoice triggers in workflows.

Case
Who should receive the email?
Invoice payment successful
 Receiver
Invoice payment failed
 Receiver
Invoice received
 Receiver
Invoice payment successful
Sender
Invoice payment failed
Sender


How to stop sending future invoices?

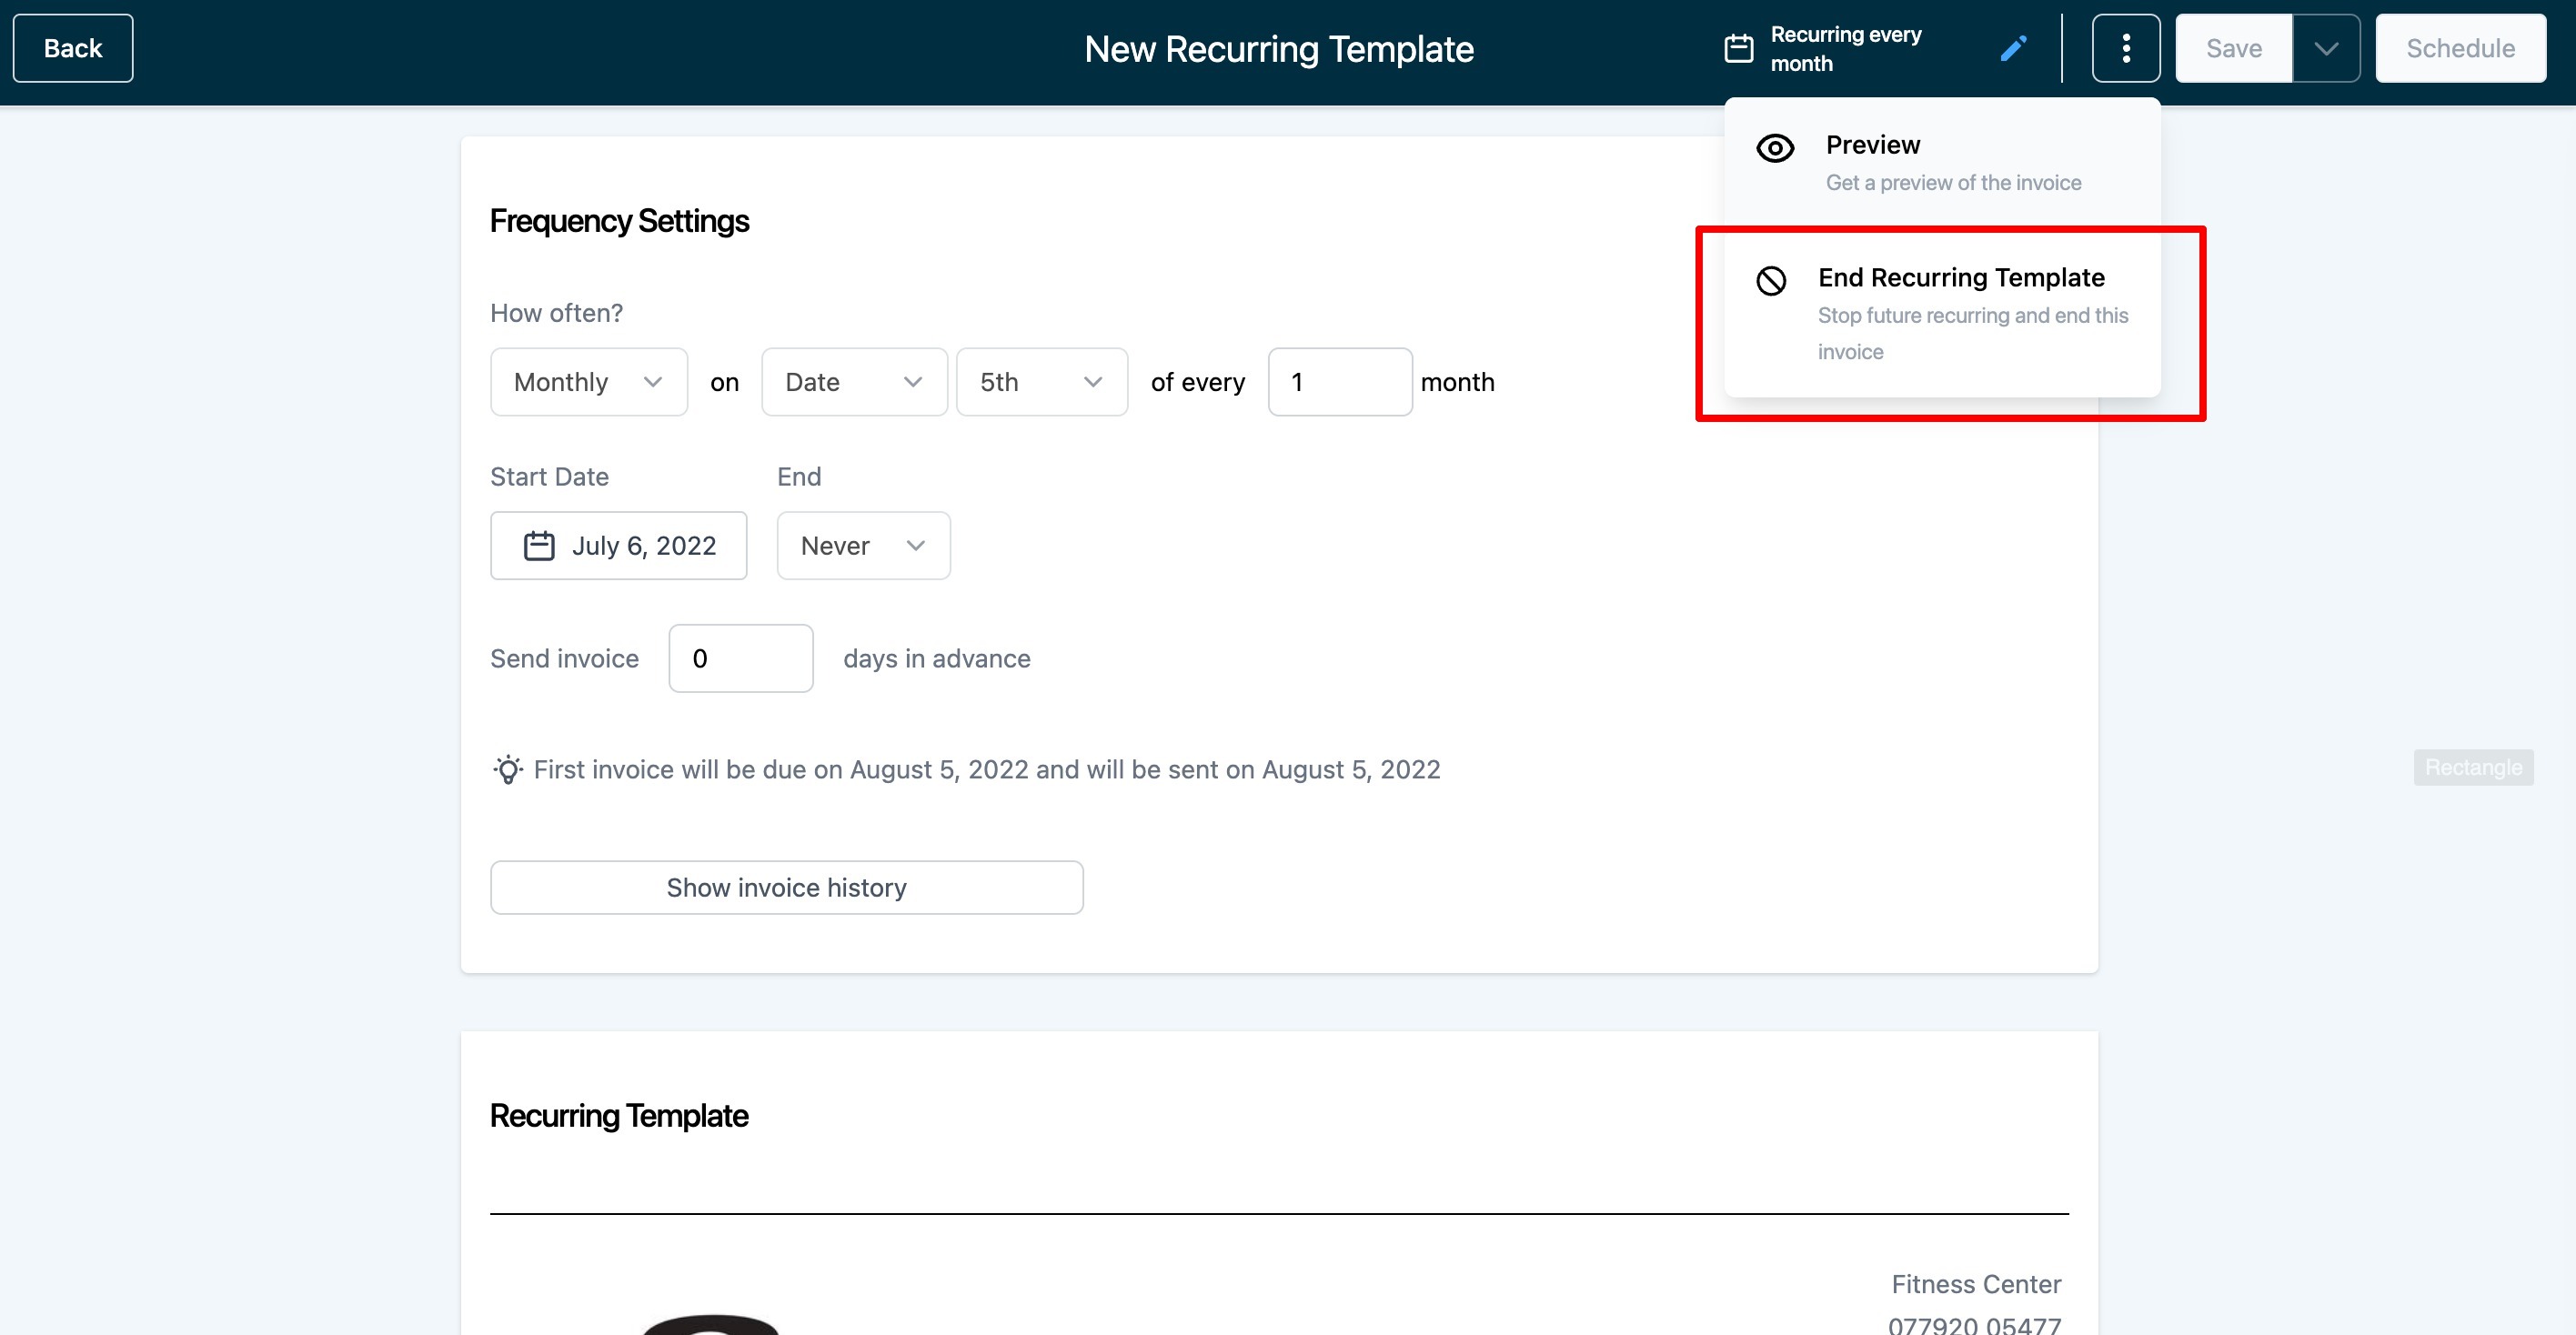
Active or Scheduled recurring invoices can be stopped from sending out any future invoices from the Recurring Templates list page. Select the End option from the Actions dropdown and confirm the same as shown below:


The user also has the option to end the recurring invoice from inside the invoice builder. 


Can I modify the price, discount, or taxes from the following occurrence?

No, you can’t change the price, discount, or taxes after you have scheduled the recurring invoice. 

Although you can individually edit the sent-out invoice and send it over again to the customer for specific instances, there is no way to change this in automation.


Can I change the frequency setting of an ongoing recurring invoice?

No, you can’t change the frequency settings after you have scheduled the recurring invoice. 


Which products can I add to recurring invoices?

Only one-time products (NOT subscriptions) can be added to a recurring invoice. In the case of recurring products, the frequency needs to be defined inside the invoice frequency setting.

Enabling Sales Receipts for Order Form Purchases

Receipts are crucial in business transactions, providing customers with documented confirmation of their purchases. They serve as proof of payment and enable businesses and customers to keep accurate records. We understand the importance of efficient receipt management, so we’re thrilled to introduce our latest feature: Automatic Receipts.


How to enable Sales Receipts 

With Automatic Receipts, businesses can send receipts to contacts for order form purchases effortlessly. This feature covers primary, bump, and upsell purchases on 1-step and 2-step order forms and subscription payments. By automating the receipt process, we aim to simplify your workflow and enhance the overall customer experience.


How to customize your Sales Receipts

We believe in giving you control over your receipts. Our platform provides several customization options to personalize your receipts:

  • Custom Title: Customize your receipt’s title to give it a personal touch that aligns with your brand.

  • Receipt Numbers: We understand the importance of keeping records in order, so we offer you the ability to assign a prefix and initial number to your receipts. This simplifies the task of tracking and managing transactions.

  • Email Template: Customizing your email templates when sending customer receipts is the perfect way to reflect your brand’s identity. With this feature, you can design and adjust the content of the email according to your preference, creating a professional and consistent experience that your customers will appreciate.


Delivery of Receipts

Automatic Receipts ensure a seamless delivery process. Receipts will be sent as downloadable PDF files attached to an email directly to the contact’s email address. This convenient delivery method allows customers to access and save their receipts easily.


Leveraging Custom Templates

We provide you with the flexibility to leverage custom templates for sending receipts. You can create personalized and branded templates with receipts using custom values available within our email builder. Craft visually appealing and professional receipts that align with your business’s unique style.


Frequently Asked Questions (FAQs)

How do I enable Automatic Receipts for my business?

Enabling Automatic Receipts is simple. Access the Settings page under the Payments menu, navigate to the Receipts section, and turn the toggle to enable automatic receipts.

Can I customize the content of the receipts?

The content of the receipts is automatically generated based on the transaction details, along with coupon discount, if applicable. However, you can customize the title, receipt numbers, and email template to add your personal touch.

Can I change the start number after creating a few receipts?

The receipt start number cannot be decreased once a receipt has been generated in the system. Users can increase the start number at any point in time, though. No number can be used twice to generate a receipt.

We hope our Automatic Receipts feature solves the pain point of manually sending email receipts after each purchase or subscription transaction. By automating this process, we aim to save you time, enhance customer satisfaction, and provide an efficient solution for managing your receipts.

If you have any further questions or require assistance, please contact our support team. We’re here to help!

How to manage Refunds within the CRM?

The refund processing feature allows businesses to issue full or partial refunds for transactions made through various payment providers, such as Stripe, Authorize.net, NMI, and PayPal. It supports refunds for Google Pay, Apple Pay, and card payments, providing a convenient way to manage refunds from a single platform.


Covered in this Article:

What is the Refunds feature?

What are some beneficial usage cases?

How to use the Refunds feature?

Supported Payment Providers

Steps to issue a Refund:

Full Refund

Partial Refund

Usage cases for Partial Refunds:


FAQs

Where will the refunded transactions be recorded?

I am not able to process refunds with Authorize.net; it gives the error “The referenced transaction does not meet the criteria for issuing a credit”

 Can I process multiple partial refunds for a single transaction?

Are Google Pay and Apple Pay transactions supported for processing refunds? 

How long does it take for a refund to be reflected in a customer’s account?

Is there a limit to the number of refunds I can process daily?

Are there specific user permissions for processing refunds? I don’t want to allow some of my business users to process refunds.


What is the Refunds feature?

Our refund processing feature is a convenient tool integrated into our payment platform, allowing businesses to manage refunds for transactions made through multiple payment providers, such as Stripe, Authorize.net, NMI, and PayPal. It supports various payment methods, including Google Pay, Apple Pay, and card payments. The feature allows you to:

  • Process full or partial refunds for transactions, giving businesses flexibility in handling customer refunds.
  • Track successful and failed refund attempts on the Transaction Details page, enabling businesses to monitor refund history and amounts for specific transactions.
  • Easily manage refunds for various payment providers and methods from one central platform, streamlining the refund process and reducing manual effort.

Please Note:

The feature currently does not support user-specific permissions for processing refunds, but it is planned for future implementation.


What are some beneficial usage cases?

The refund processing feature can be beneficial in various usage cases:

  • Resolving customer disputes: In cases where customers are unsatisfied with a product or service, the feature allows businesses to quickly and efficiently process refunds, improving customer satisfaction and trust in the brand.
  • Addressing billing errors: If a customer has been charged incorrectly or multiple times, businesses can use this feature to issue a refund promptly, ensuring a smooth customer experience and reducing the potential for negative feedback.
  • Handling order cancellations: When a customer cancels an order or service, the refund processing feature enables businesses to process the necessary refunds efficiently, reducing administrative effort and wait times for the customer.
  • Managing returns and exchanges: In cases where customers return products or request an exchange, businesses can use the feature to refund the original purchase amount and facilitate a new transaction for the replacement item.
  • Offering discounts and promotions: Businesses can use the feature to issue partial refunds to customers in cases where a discount or promotional offer was not applied correctly at the time of purchase, ensuring the customer receives the intended savings.

How to use the Refunds feature?

Supported Payment Providers

The refund action is available for all payment providers (Stripe, Authorize.net, NMI, and Paypal)

There is no option as of now to refund the subsequent recurring transactions from subscriptions.

Steps to issue a Refund:

Head to Payments > Transactions> Click on the three dots next to the payment you want to refund> then click on Refund.

Full Refund

If you want to issue a full refund, it will pre-populate the total amount of the transaction in this window for you automatically:

Partial Refund

You can edit the pre-populated amount to anything less than the Full amount of that transaction if you want to issue a Partial Refund.

Please Note:

Anything filled out in the Notes area is for your own record and shows up under the Notes Column in Refund details for the individual Transaction.

Usage cases for Partial Refunds:

The partial refund feature can be valuable in various usage cases:

  • Adjusting for pricing errors: If a customer was charged the wrong price for a product or service, businesses could use the partial refund feature to return the difference between the incorrect and correct price, ensuring the customer is fairly charged.
  • Offering post-purchase discounts: Businesses may apply a particular discount or promotion to a customer’s purchase after processing the transaction. A partial refund can be issued to provide the customer with the intended savings.
  • Resolving disputes with a compromise: In cases where a customer is not entirely satisfied with a product or service, but the business and customer agree on a fair compromise, a partial refund can be issued to reflect the agreed-upon resolution.
  • Handling partial returns: When a customer returns only part of an order, businesses can use the partial refund feature to refund the value of the returned items without affecting the remaining portion of the order.
  • Compensating for damaged or missing items: If a customer receives an order with damaged or lost items, businesses can issue a partial refund to compensate for the inconvenience and value of the affected items.
  • Reimbursement for shipping costs: In cases where a customer has experienced shipping issues or delays, businesses may issue a partial refund to cover the shipping costs as a gesture of goodwill.

FAQs

Where will the refunded transactions be recorded?

All the successful/failed attempts to process refunds will be placed under the Transaction details page. This will help keep track of the refunded amounts within a specific transaction.

I am not able to process refunds with Authorize.net; it gives the error “The referenced transaction does not meet the criteria for issuing a credit”

This is happening probably because the refund does not meet the critRefundith the payment provider. Authorize.net would only allow refunding transactions after 24 hours from the transaction time. The ability to process refunds for older transactions depends on the policies of the payment provider and any specific time limitations they may have. Please refer to your payment provider’s guidelines or contact their support team to clarify refunding older transactions.

 Can I process multiple partial refunds for a single transaction?

 Yes, you can process multiple partial refunds for a single transaction if the cumulative refund amount does not exceed the original transaction amount.

Are Google Pay and Apple Pay transactions supported for processing refunds? 

Yes, Google Pay and Apple Pay transactions and card payments can be refunded from the platform. This will refund the amount with the bank account associated with the corresponding bank account associated with Card or Google/Apple account.

How long does it take for a refund to be reflected in a customer’s account?

The time it takes for a refund to appear in a customer’s account can vary depending on the payment provider and the customer’s bank. Generally, the refund may take four to six businRefundys to be reflected in the customer’s account.

Is there a limit to the number of refunds I can process daily?

A5: There is typically no fixed limit to the number of refunds you can process daily. However, it’s essential to check with your payment provider to confirm if they have any specific limitations or requirements for processing refunds.

Are there specific user permissions for processing refunds? I don’t want to allow some of my business users to process refunds.

As of now, user permissions are not enabled for processing refunds. The best way to identify any refunds made within a transaction is to look at the transaction details. We have user-specific permissions on our to-do list. Businesses can filter any refunded transactions using the direct filter on the Transactions table.


Funnels & Websites Category

WordPress

How to point your domains or subdomains to your WordPress Site?

If you are setting up a new WordPress website, migrating & existing one, or just adding additional domains, you will need to configure your domain's DNS to point to your WordPress instance.

How to point your domains or subdomains to your WordPress Site

Setting up a new WordPress Site Setting up new WordPress as a Blog Linked Articles for other Domain Registrars Setting up new WordPress site as your main site Migration of an Existing Website

WordPress - Adding Domains for your site

Adding a domain to a WordPress site is necessary to make the website accessible to the public through that Domain. A domain serves as the website's address, and visitors can use it to access the site.

WordPress - Adding Domains for your site

a)  Adding a domain for your site
b) Adding additional domains for your WordPress site
c) Adding a root Domain to WP site

How to Add Domains in the WordPress Dashboard

Adding Primary Domain in WordPress Dashboard: Step 1: Add Your Domain Name Step 2: Configure SSL Certificate Step 3: Update DNS Adding Sub Domain in WordPress Dashboard: Step 1: Add Your Sub-Domain Name Step 2: Update CNAME and A record with your DNS provider Comprehensive Domain/Sub-Domain Dashboard:

Digital Products

How to add a product to a funnel or website

How to set up your very own Customizable 404 Error page?

Funnels & Websites Builder

A cookie policy is a legal requirement for websites that use cookies or similar tracking technologies. It informs users about the types of cookies used, their purposes, and how users can manage their preferences. Here are some key components to include in a cookie policy.

If you are planning to use any of the below tools for analytics please use the codes in the doc for setting them up

  1. FB Pixel

  2. Google Tag Manager

  3. Google Analytics

We're excited to announce a smoother process for migrating your existing domains to CloudFlare with our latest release. Say goodbye to the hassle of deletions and re-additions – introducing One-Click Migration with Domain Connect!

Funnel Analytics

Events

To effectively manage event tracking on your website, follow these steps to locate and create your Pixel ID:

Creating a New Facebook Pixel

  1. Access Facebook Ads Manager:
    • Open your Facebook Ads Manager.
    • Click on the top menu and select the “Pixels” link.
  2. Create a Pixel:
    • If no pixel is currently associated with your account, you will see a prompt to create one.
    • Click the green “Create a Pixel” button.
  3. Name Your Pixel:
    • Enter a name for your new pixel.
    • Click “Create” to finalize the process.

Your new pixel is now ready and can be installed in your GoHighLevel funnels and websites.

Enhance your event tracking by sending automatically triggered standard events directly to Facebook’s servers, bypassing browser limitations and ad-blockers.
This powerful feature, known as Conversion API enables seamless event tracking. GoHighLevel allows you to send all events using both the browser and the Conversion API.

Steps to Create Your Access Token

  1. Open Events Manager:
    • Access the top menu, click to open it, and select “Events Manager”.
    • Alternatively, you can directly navigate to: Facebook Events Manager.
  2. Locate Your Pixel Settings:
    • Click on your Pixel ID.
    • In the left side menu, click on “Settings”.
  3. Create Your Access Token:
    • Scroll down to the "Server-Side API for Web" section.
    • Click on "Create Access Token" and follow the instructions.

    • You will be prompted to select the pixel, create or select an app, and create or select a user.
    • A token will be generated. Click on the token to copy it.

With your access token, you can now configure Conversion API events for robust and reliable event tracking on your website.

Reputation & Review Management

Online Listings

Review Widget Customisation in reputation management is not just about making reviews look good; it's about strategically leveraging customer feedback to boost reputation, build trust, and drive conversions. By personalising review widgets to align with brand identity and audience preferences, businesses can harness the full potential of their online reviews and thrive in the digital landscape. 

Keeping this in mind, we introduce the new and improved Review Widget customisation feature. This powerful tool allows you to create and tailor review widgets to perfectly match your brand's style, content, and preferences. Whether you're a seasoned user or just getting started, this guide will walk you through the process of creating and customising your review widgets step by step.

TABLE OF CONTENTS

1. Accessing the Review Widget Customisation Tool

To get started with customising your review widgets, click on Reputation and navigate to the Widgets tab. 

Click the "Create New Widget" button to begin crafting your custom review widget. Alternatively you can also choose from the existing template from the templates tab.

2. Layout Tab: Configuring Widget Structure

In the "Layout" tab, you can define the fundamental structure of your widget:

  • Select your preferred widget type: List, Masonry, Grid, or Legacy. The Legacy widget type retains the characteristics of our original widget style, primarily for backward compatibility, and offers limited customization options.
  • Choose the source of your reviews, such as GMB and FB.
  • Define the maximum number of reviews you wish to showcase.
  • Toggle the option to enable or disable the "Powered by" section that is displayed at the end of the review widget.

3. Content Tab: Editing Widget Header and Description

In the "Content" tab, you can fine-tune how your widget appears:

  • Enhance Widget Title and Description: Craft compelling and on-brand widget titles and descriptions. Customise them to effectively communicate your message.
  • Header Section Customisation: In the header section, you have the option to enable/disable the display of the rating, total review count, and "Write a review" button within the widget.


4. Appearance Tab: Choosing Themes and Colours

The "Appearance" tab gives you control over the visual style of your widget

  • Choose from Light, Dark, or create a Custom theme.
  • If you opt for Custom theme, customise individual component colours such as widget heading colour, reviews colour, star rating colour, Background colour, Border colour and more.


5. Settings Tab: Fine-Tuning Widget Behaviour

In the "Settings" tab, you can further refine your widget's behaviour:

  • Enable or disable review elements like the display of the review date and reviewer icon.
  • Choose to exclude reviews containing no description.
  • Generate an embed code for your website. Copy the provided code and paste it into the HTML of your website to display your widget where you want it.

Alternatively you can also copy code directly from the copy code icon at the top right of the widget screen


6. Saving, Naming, and Managing Your Widgets

Give your widget a meaningful name for easy reference. You can view all your saved widgets in the saved widgets tab. Choose to save your widget for later use or make it live immediately.

You can also delete widgets you no longer require by clicking on the triple-dot menu at the widget's upper corner.

Conclusion

With our Review Widget Customisation feature, you have the flexibility to create stunning review widgets that align with your brand's identity. Customize the layout, content, appearance, and settings to create widgets that captivate your audience and enhance your online reputation. Start creating your custom review widgets today and make a powerful impression in the digital world.

When you flag a review as inappropriate, Google may take action against the reviewer, such as removing the review or banning the reviewer from leaving future reviews. This is usually only done if the review violates Google’s guidelines, such as posting spam or containing offensive language. If you believe a review is fake or biased, you can report it to Google for further investigation.


Please Note: 

You can only dispute a review from within the conversations tab if it was generated by the system. If the review was not generated from the system please start the process by clicking here 

TABLE OF CONTENTS


Reporting a Google Review from within the Conversation tab


To report a Google review from within the CRM you would need to go to the Conversations tab and search for the contact you want to report the review for and click on Dispute this review:

You will be prompted to confirm your Google email and business account associated with the GMB review in question.


Next, you'll choose whether you'd like to report a review or check the status of a review you've already reported:

 
If you choose to report a new review to be removed, Google gives you a list of your recent reviews that you can click to view on Google Maps or submit a takedown request:


Checking the status of existing Reviews you have Reported

  • To check on the status of a review that you have already reported, click here.
  • If you chose to check the status of a review you previously reported, it will show you those reviews, including their current status.


You can then select that review to see more of a summary and even submit an appeal if your takedown request was not accepted.

Sending review request emails is an essential part of gathering feedback and improving your business's reputation. Including a review link in these emails makes it easy for customers to leave feedback, but setting it up correctly is crucial. This guide will walk you through the steps to set up a review link in your review request email effectively.

Guide on How-to set up a Review Link


Step 1: Access Settings in Reputation tab

  • Go to Reputation Tab in your sub-accounts and click on settings. You will see a section for setting up your Review Link.
  • You can set up your review Link based on which platform you would need your reviews to be obtained from users - Google, Facebook, or a Custom Link
  • This Link will be the default link used in all your Review Requests sent via Email/SMS
  • Alternatively you can also go to the Email Review Requests section of Settings tab. Open Email Builder -> Add a Button -> Set the Link URL as {{reputation.review_link}}.


Note: You wont be able to send a review request without setting up a Review Link.

Marketing Category

Workflow

Inbound Webhooks enable seamless CRM integration by allowing external systems to automatically send data using various HTTP request methods like GET, POST, and PUT. This real-time data transfer capability enhances CRM functionality and streamlines workflows, facilitating efficient communication and collaboration across various platforms and tools.

Covered in this Article:

What is an Inbound Webhook?

What are some excellent usage cases for this?


How to use the Inbound Webhook Workflow Trigger?

Step 1

Step 2

Step 3

In your communication Actions:

In If/Else Actions:

Important points to be considered:


What is an Inbound Webhook?

An Inbound Webhook is a robust feature that facilitates the automatic data transfer from external systems to your CRM, improving integration and interoperability. When an event occurs in an external system, an HTTP request (POST, GET, or PUT) is sent to a specific URL linked to a trigger within your CRM, initiating a workflow. This real-time data transfer capability enhances your CRM's functionality and streamlines workflows across various platforms and tools.

By leveraging Inbound Webhooks, businesses can automate processes, reduce manual tasks, and minimize human error, increasing efficiency and productivity. Furthermore, it enables better collaboration between teams, as critical data is readily available and synchronized between different systems. This seamless integration ultimately improves decision-making, customer satisfaction, and business performance.

What are some excellent usage cases for this?

Inbound Webhooks can be used in various scenarios to enhance CRM functionality and automate workflows. Here are a few practical usage cases with examples:

eCommerce Order Integration:

Suppose you have an online store and want to update your CRM with new order information when a customer orders. You can set up an Inbound Webhook in your CRM to receive data from your eCommerce platform whenever a new order is created.

Example: Your eCommerce platform sends an HTTP POST request to the webhook URL with order details such as customer name, email, phone number, and order value. Your CRM then creates or updates the customer's contact information and adds the order details to their record.

Customer Support Ticketing System Integration:

Your company may use a separate support ticketing system to handle customer issues. When a customer creates a support ticket, you can use an Inbound Webhook to send the ticket details to your CRM, ensuring the support team has all the necessary information.

Example: Your support ticketing system sends an HTTP POST request to the webhook URL with the ticket details, including customer email, ticket title, and description. Your CRM then associates the ticket with the corresponding customer record, allowing your support team to access the ticket information directly from the CRM.

Event Registration Integration:

If you host events and use an event registration platform, you can use an Inbound Webhook to send attendee registration information to your CRM.

Example: Your event registration platform sends an HTTP POST request to the webhook URL with attendee information such as name, email, phone number, and event name. Your CRM then creates or updates the attendee's contact information and adds the event registration details to their record, allowing your event team to manage and communicate with attendees effectively.

Lead Capture from Web Forms:

Inbound Webhooks can capture leads from web forms on your website or landing pages and send the data to your CRM.

Example: When a visitor submits a form on your website, your web form sends an HTTP POST request to the webhook URL with the lead's information, such as name, email, and phone number. Your CRM then creates a new lead or updates an existing contact, allowing your sales team to follow up with the lead promptly.

These are just a few examples of how Inbound Webhooks can automate workflows, streamline processes, and enhance CRM functionality in different business scenarios.

How to use the Inbound Webhook Workflow Trigger?

Briefly, bring your data to the system in 3 simple steps using the Inbound Webhook Trigger.


Step 1

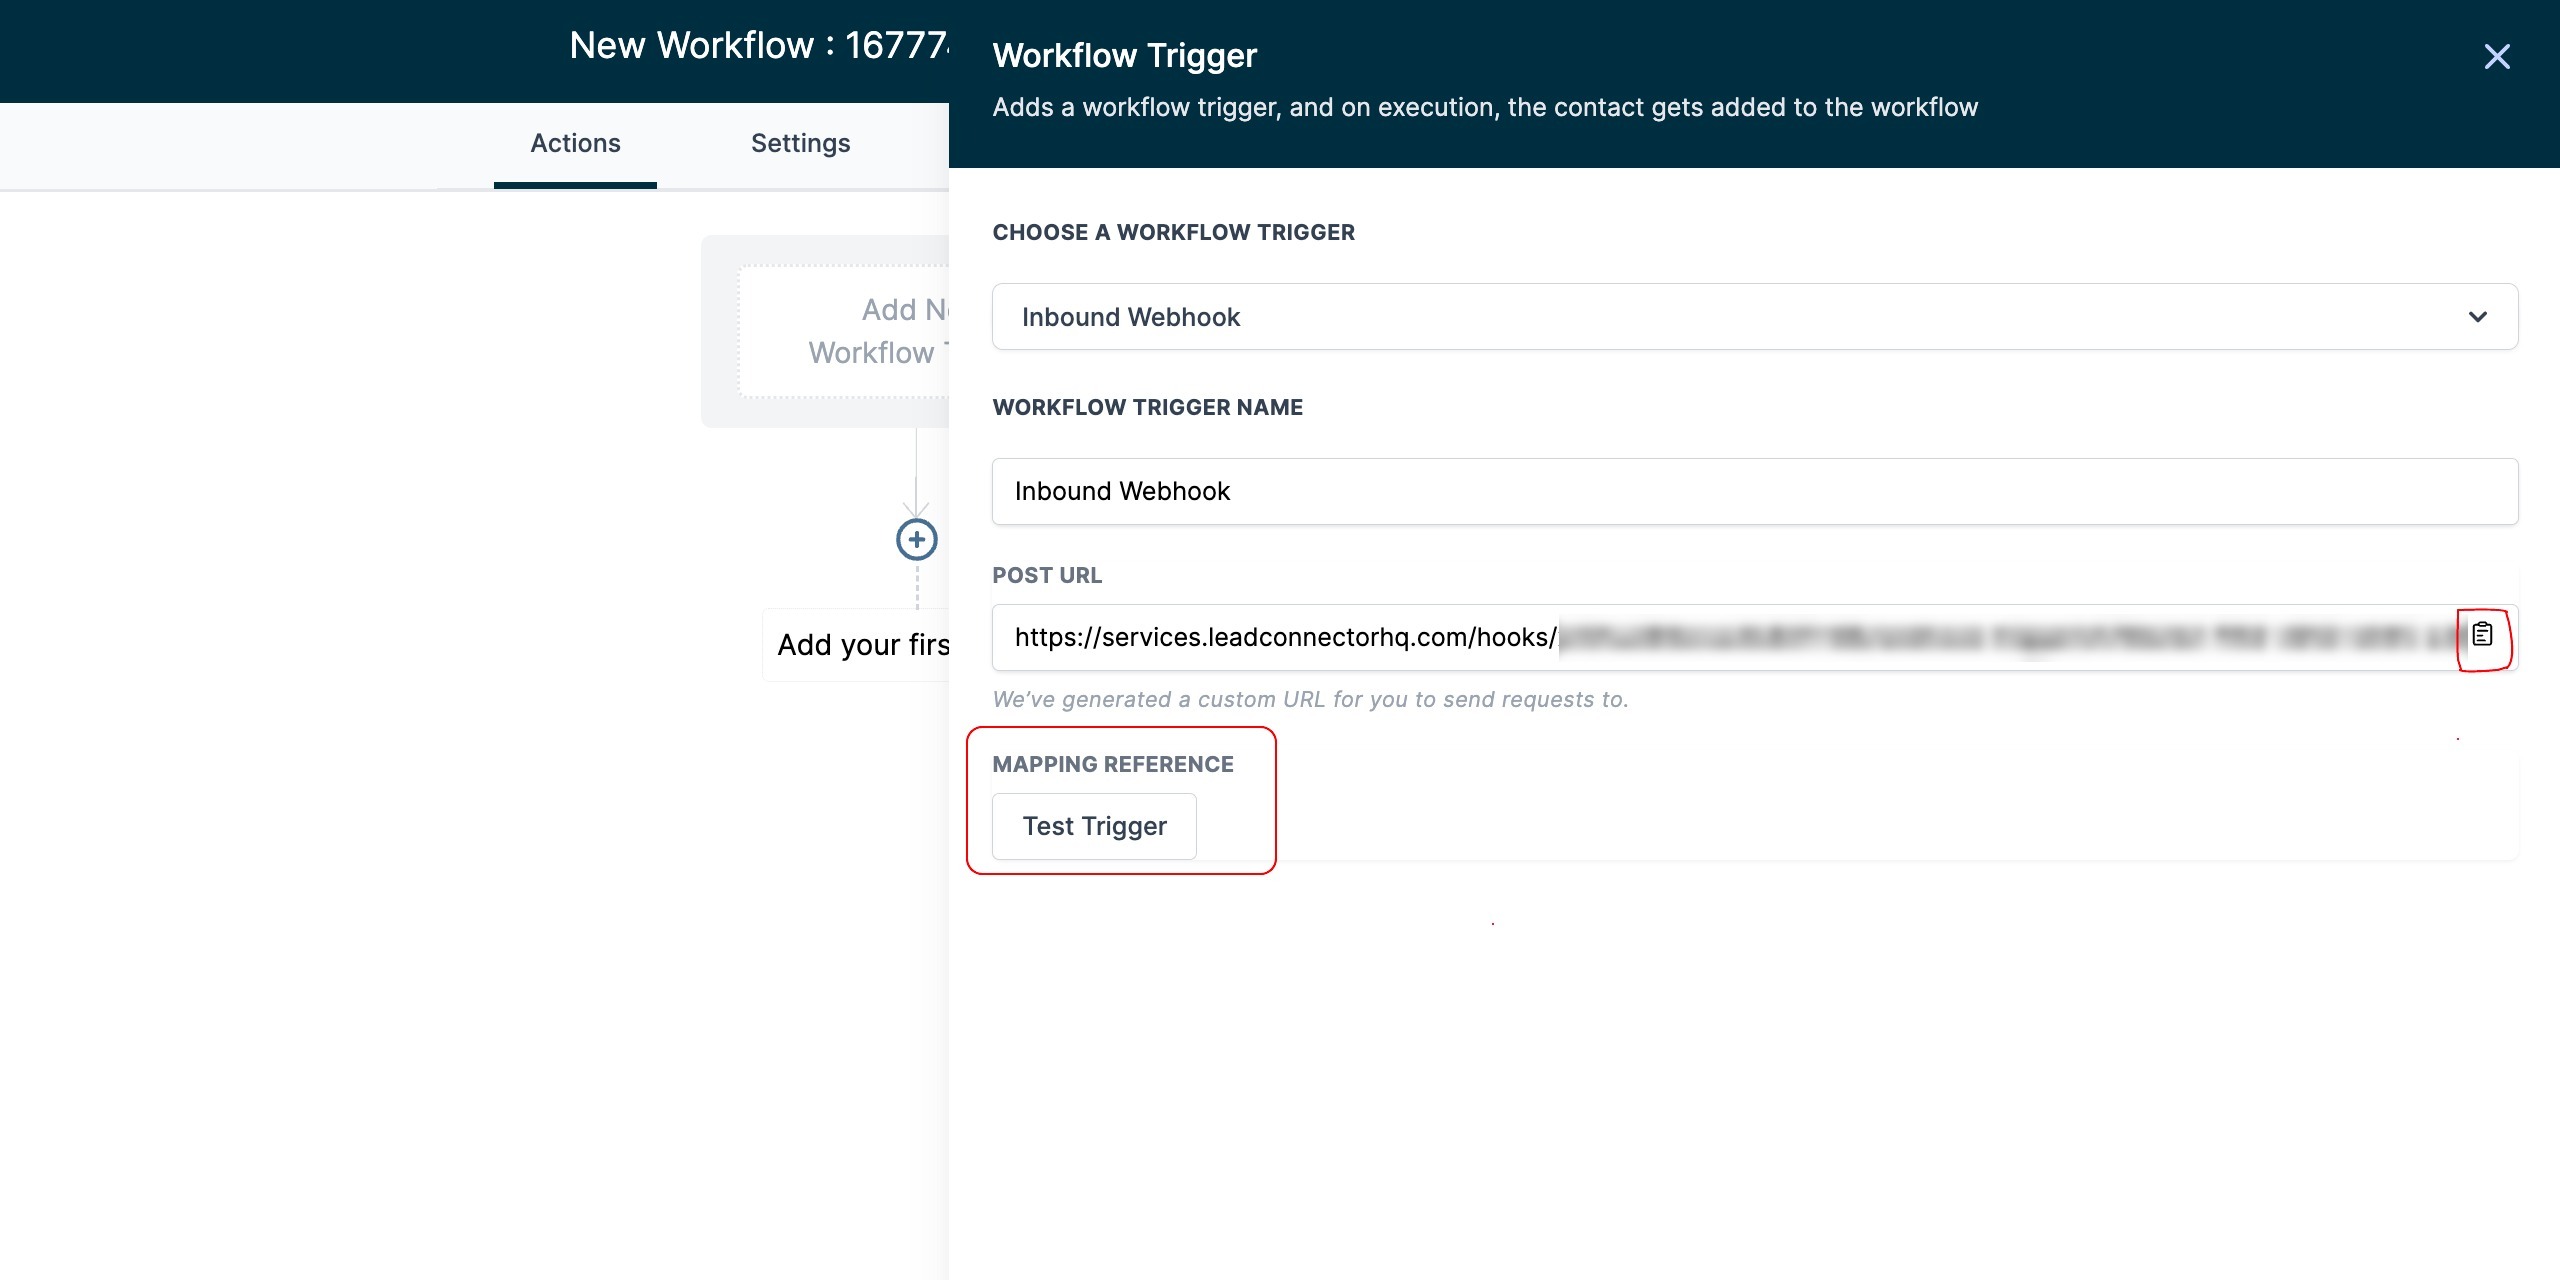
Retrieve the webhook URL and use it in your application or system. Next, send the data to the webhook URL using the appropriate HTTP request method (POST, GET, or PUT) and click the "Test Trigger" button.

Step 2

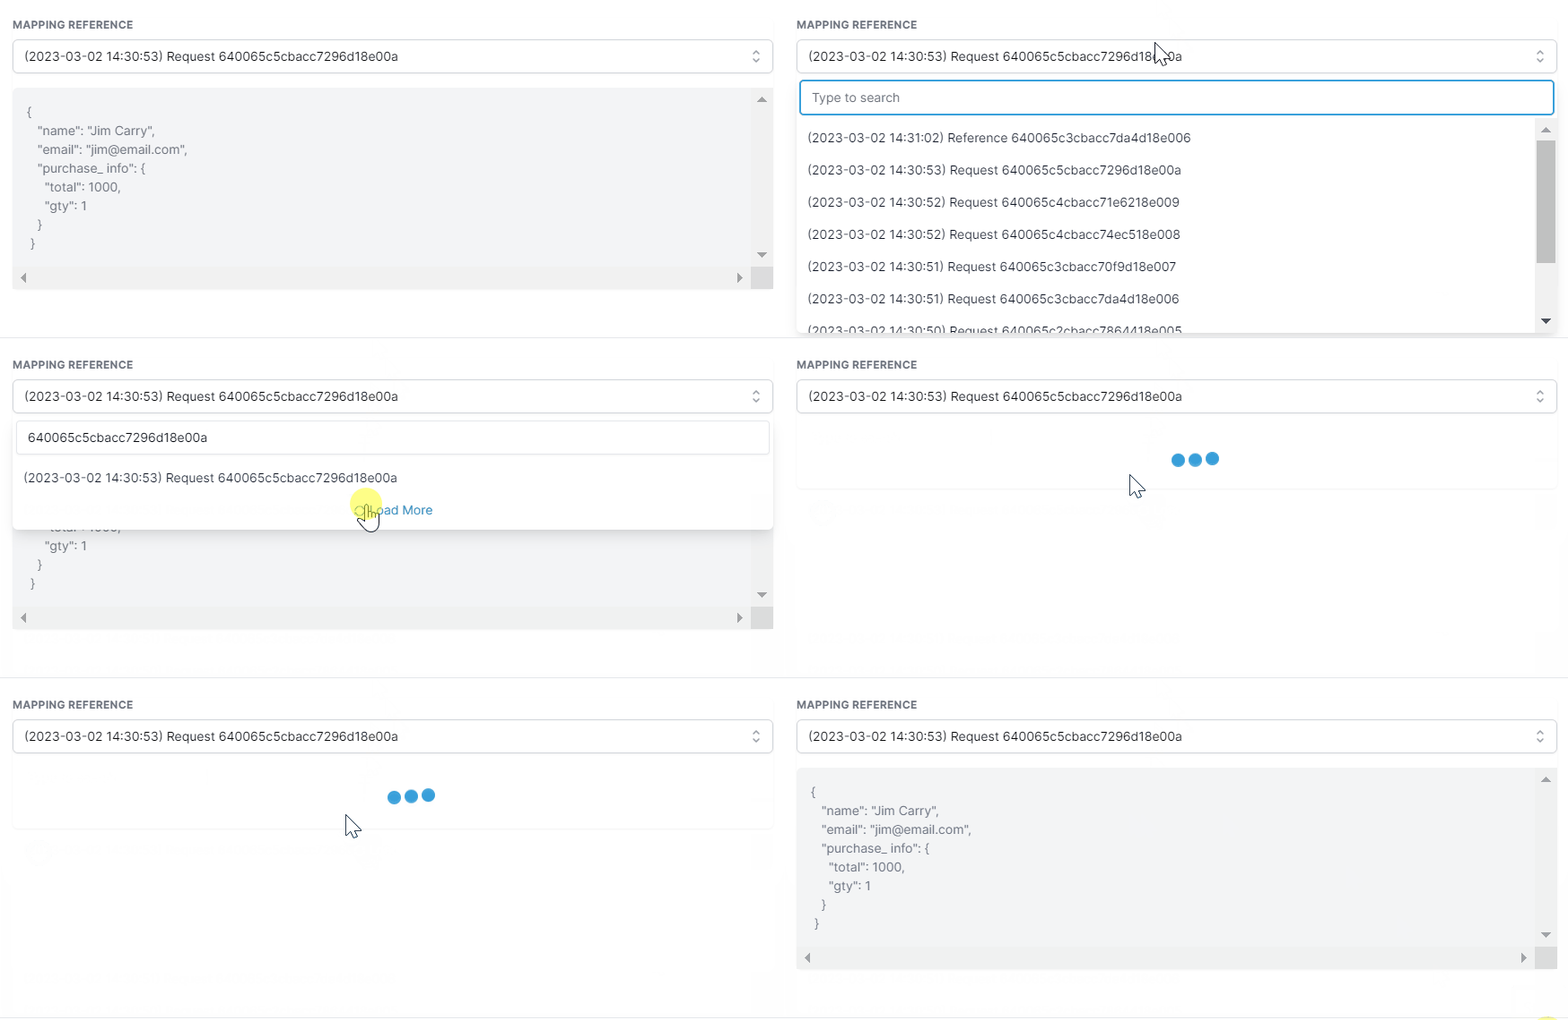
Choose the data received from your application or system using the supported HTTP request method (POST, GET, or PUT) and save it as sample data for future reference. Click on "Load More" to view additional recent data. Once you've selected the desired data, save the trigger.

In this step, you can save the data reference for custom variables, which can be treated similarly to other contact custom fields or Location Custom Variables.

The next step and examples below provide more information on utilizing this reference.

Step 2.1: Send a supported HTTP request (POST, GET, or PUT) to the copied webhook URL and copy the ID in the response.


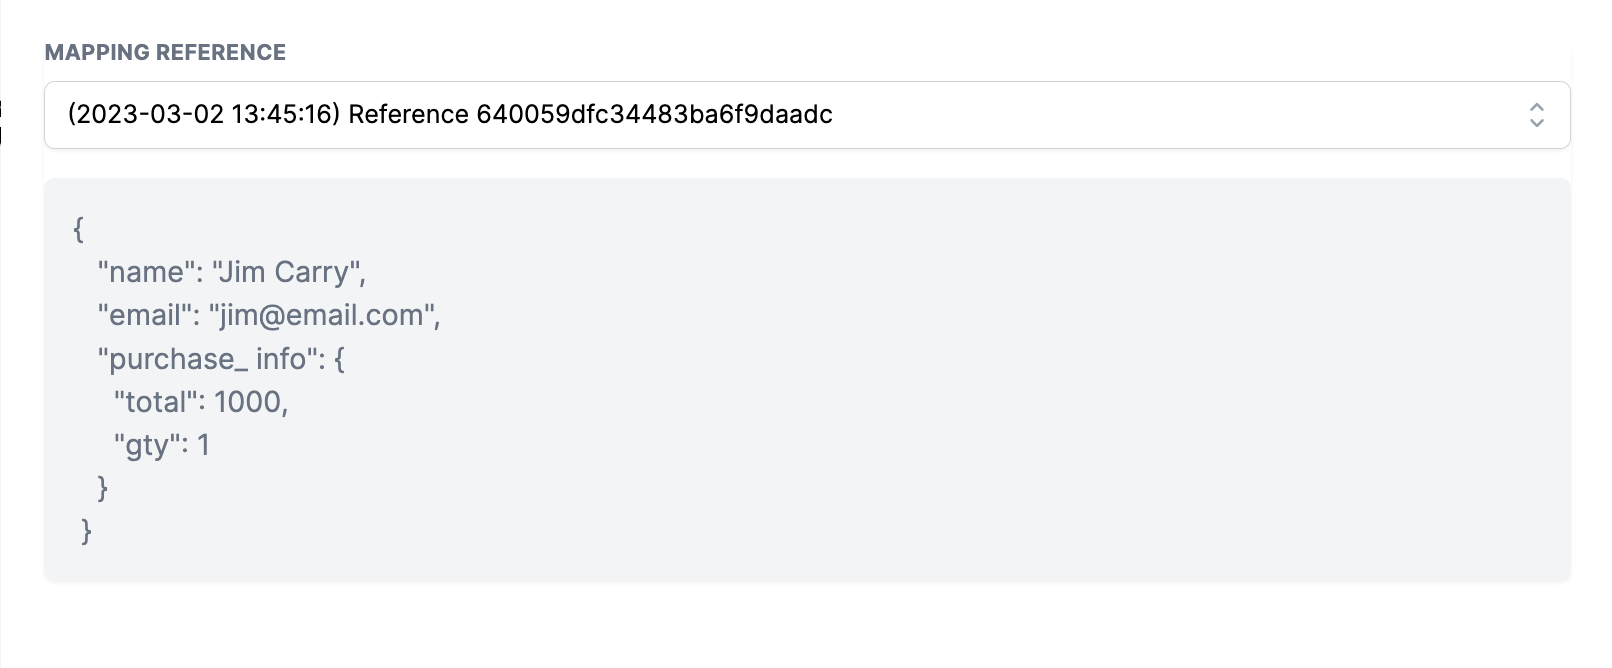
Step 2.2: Copy the unique ID obtained from the supported HTTP request (POST, GET, or PUT) and use it to search for the relevant mapping reference within your webhook trigger.

Please note that the most recent request will always be at the top of the list.

Step 2.3: Select the correct reference and verify the body.


Step 3

You will be directed to the "Create Update Contact" action after saving the trigger. From there, you can select the necessary fields and map the incoming data you received from the trigger. Please note that to create a new contact or map data to an existing one, you must provide either an email or phone field.


By completing the above steps, you can now use the data you received within the workflow as custom values in email, sms, if/else, etc.


Example:

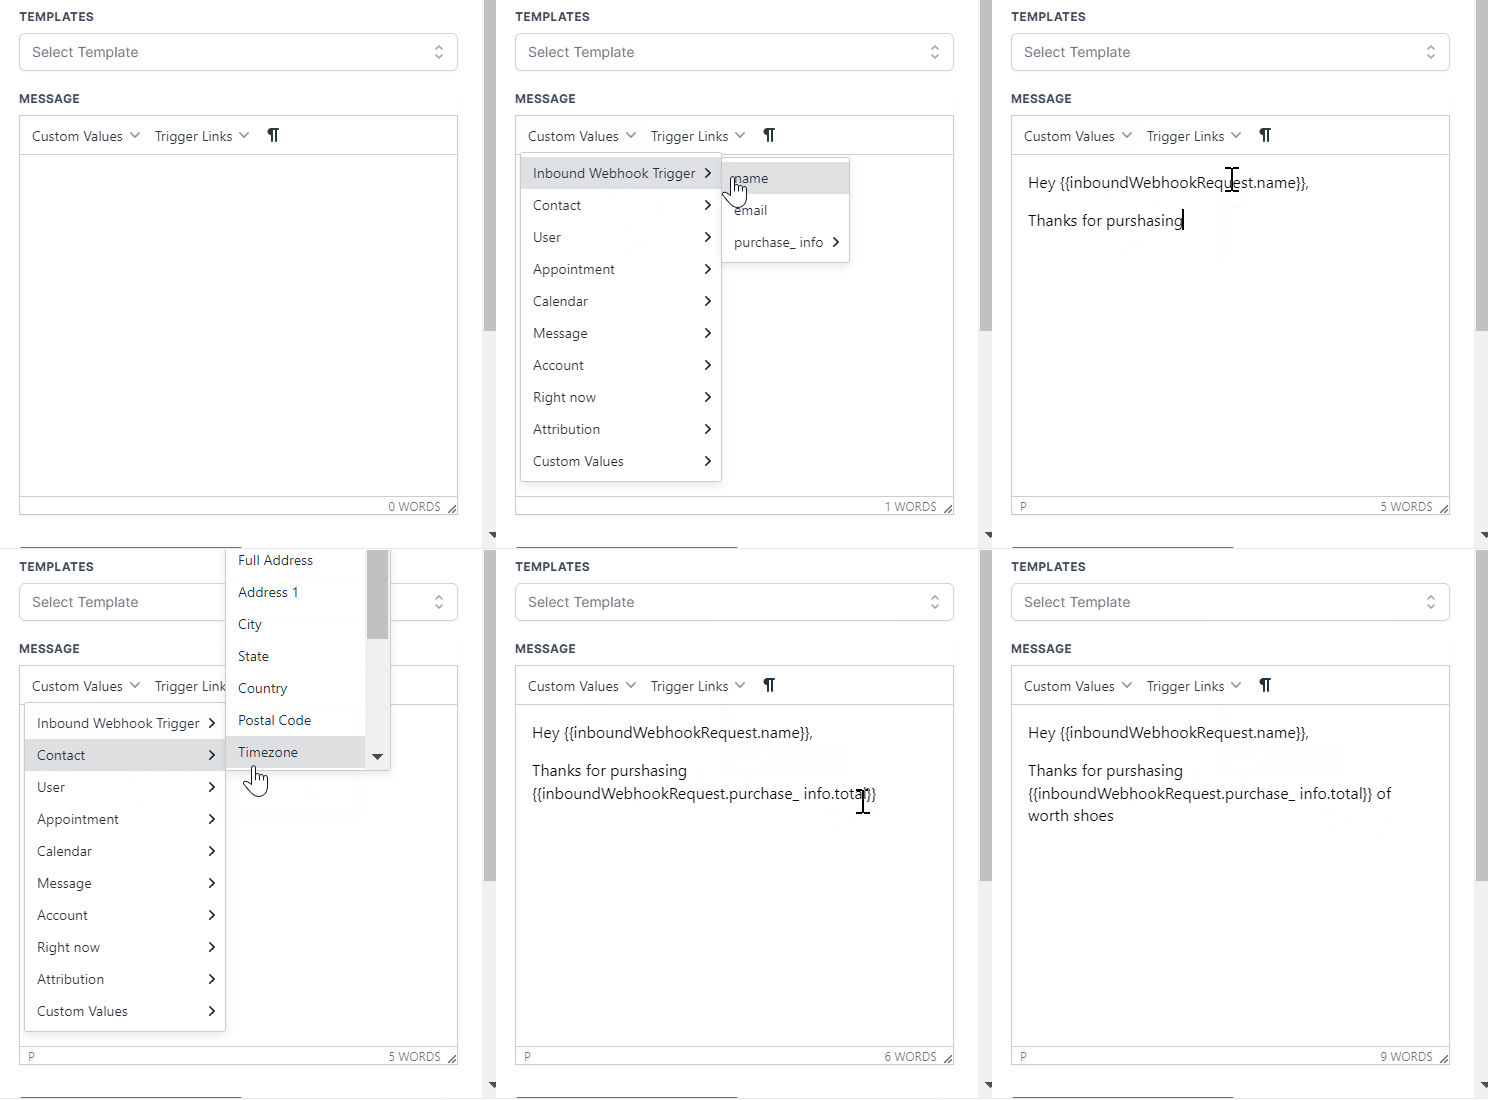
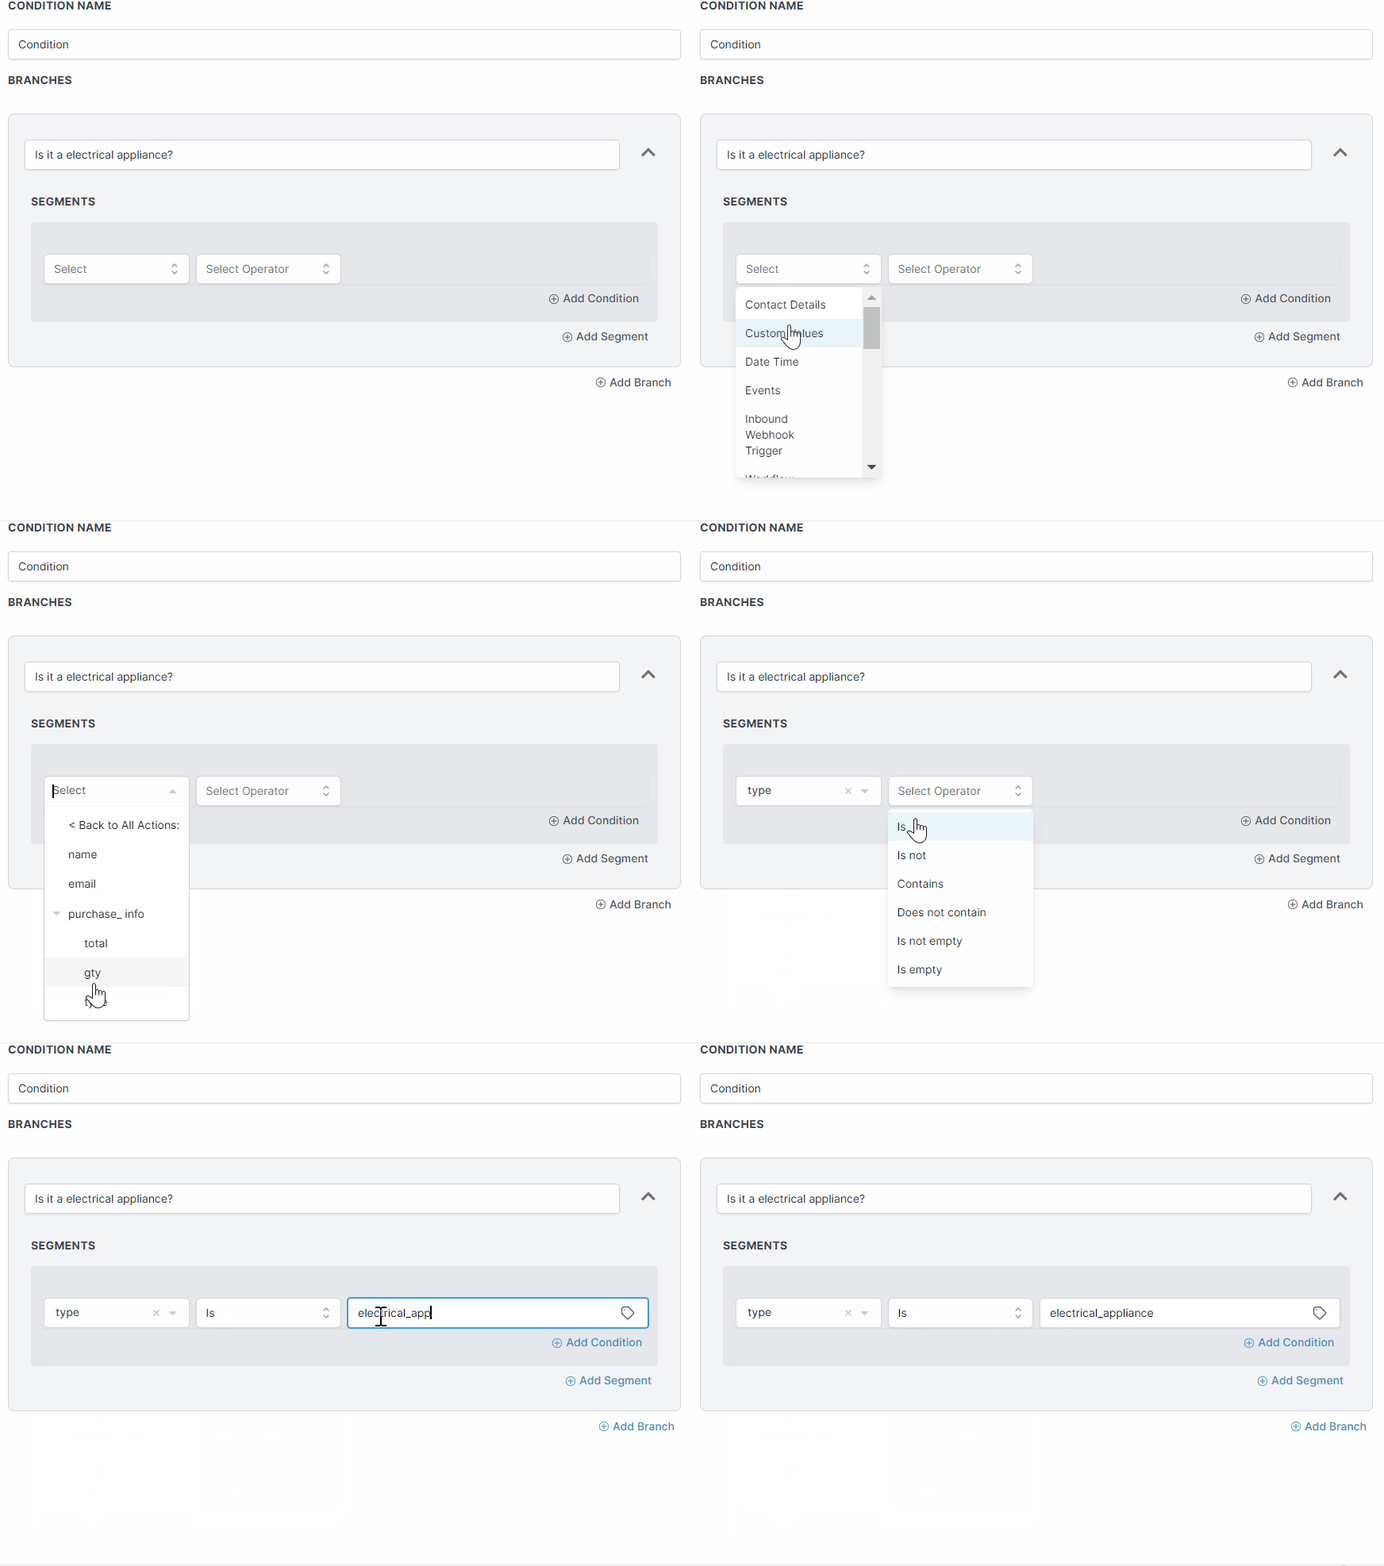
The custom values of Inbound Webhook can be utilized in all of the actions within your workflow. Some examples of how to do this are provided below.

In your communication Actions:


In If/Else Actions:

As shown above, you can use the values from the Inbound Webhook inside all other actions as you see fit.


Responses:

  • When mapping request is Sent
    Status code - 200

{
"status": "Success: test request received"
}
  • When you execute actual trigger
    Status code - 200

{
"status": "Success: request sent to trigger execution server",
"id": "66756001f47f59dde9d86009"
}

Important points to be considered:

  • Always send the request using a supported method (POST, GET, or PUT) when interacting with the webhook.
  • Ensure the data is sent as a JSON object, the only supported data format.
  • To compile correctly, keys must be a single string without space separations; consider using CamelCase or snake_case instead of separating key names with spaces.
  • Providing an Email or Phone number in the payload is mandatory, as the workflow requires contact information. An Email or Phone is required to Find or Create the Contact.
  • Arrays are not supported in custom values. You can send them in the request but cannot use them inside actions.
  • If your data structure changes, re-select the Mapping Reference inside the Inbound Webhook Trigger setup to address those fields in other actions correctly.
  • If your Inbound Webhook Trigger URL gets compromised or leaked and you want to prevent unwanted requests, Delete the existing Inbound Webhook Trigger and Add a New Inbound Webhook Trigger. A new URL with a different ending ID will be generated; update your integrations to match the new URL. Once saved, incoming requests from the old URL won't enter your workflow; only requests from the new URL will.

In this guide, we'll explore the "Set Event Start Date" Workflow Action, a dynamic tool that allows you to schedule tasks and reminders within your workflow for precise event management. This feature is crucial for maintaining well-organized webinars, conferences, or personalized notification systems..

Covered in this Article:


What is the Set Event Start Date Step in Workflows?


The "Set Event Start Date/Time" action is a tool within a workflow management system that allows you to define a specific date and time to serve as the reference point for subsequent steps in your workflow. It's especially useful for scheduling tasks, reminders, or actions that need to occur before or after a particular event.

Once this action is set, you can use the "Wait" steps in your workflow to Wait for Event/Appointment Time to pause the execution until a specified time relative to this event date. For example, you could set up reminders to go out several days before an event or schedule a follow-up action for several days after the event.

This tool offers flexibility and automation, enabling effective time management within your workflow. It's particularly valuable for managing webinars, conferences, meetings, and events.

What are the benefits of this feature?

The "Set Event Start Date/Time" action offers several practical benefits for managing workflows and events:

Automated scheduling: This action allows you to schedule tasks, reminders, or emails to occur at specific times relative to an event automatically. This can greatly reduce manual work and ensure nothing gets overlooked or forgotten.

Timely reminders: If you manage events such as webinars or conferences, this action can automatically send reminders to attendees a certain number of days or hours before the event starts, increasing engagement and attendance rates.

Follow-up actions: You can also use this action to schedule follow-up tasks or communications after an event. For example, you could automatically send out a survey or a thank you email several days after an event.

Flexibility: The "Set Event Start Date/Time" action isn't limited to specific dates. It can be used with any date-related field, so you could set it up to trigger tasks based on individual customer dates, like renewal dates or birthdays.

Recurring Events: It can also handle recurring events. For instance, if you run weekly webinars, you can set up your workflow to automatically send out reminders each week and then reset the event date for the following week.

Time-specific Actions: Some actions need to happen at a specific time, such as a social media post or a sales announcement. This action lets you schedule those actions precisely.

What are some practical usage cases of this Workflow Action?

Webinar Management: If you're organizing a webinar, you can use the "Set Event Start Date/Time" action to specify the webinar date and time. Then, you can add "Wait for Event/Appointment Time" steps to send out reminder emails a week, a day, and an hour before the webinar starts. A follow-up email could be set to go out a day or two after the event to thank participants and share additional resources.

Subscription Renewals: For a service with annual renewals, you can pair this action with a custom date field for each customer's renewal date. Using "Wait for Event/Appointment Time" steps, reminders can go out a month, a week, and a day before each customer's renewal date, nudging them to renew and providing necessary instructions.

Conference Planning: When organizing a conference, set the conference date as the event start date, and use "Wait for Event/Appointment Time" steps to automate communications like early bird registration reminders, ticket purchase reminders, event schedules, or last-minute updates.

Birthday Promotions: For businesses that offer special promotions for customers' birthdays, this action can be paired with a custom field for each customer's birthday. A "Wait for Event/Appointment Time" step can be set up to send a birthday greeting and a special birthday discount.

Product Launches: If you're launching a new product, the launch date can be established as the event start date. You can set up a series of "Wait for Event/Appointment Time" steps to send out teaser emails leading up to the launch, a launch announcement on the day, and follow-up communications after the launch.

Training Sessions: If you're providing training sessions, use the "Set Event Start Date/Time" action to mark the session's start. Then, use the "Wait for Event/Appointment Time" steps to send out session details, reminders a few days before the session, and last-minute reminders an hour before it starts. You can also schedule a follow-up email to share session recordings or materials.

Product Trials: For a product or service with a free trial period, you can set the trial expiration date as the event start date. Using the "Wait for Event/Appointment Time" steps, send reminders to users a week, three days, and one day before their trial expires, encouraging them to purchase the full version.

Sales or Promotions: If your business has a sale or promotion, set the start date/time of the sale as the event date. You can then schedule "Wait for Event/Appointment Time" steps to send out teaser emails, launch the sale, and send last-chance reminders as the sale ends.

Annual Checkups or Maintenance: If your business involves annual checkups or maintenance, like an HVAC business or a dentist's office, you can set each customer's next appointment date as the event start date. Then use the "Wait for Event/Appointment Time" steps to remind customers of their upcoming appointment and follow up afterward.

Project Deadlines: If you're managing a project with a specific deadline, you can use the "Set Event Start Date/Time" action to mark the deadline and then use the "Wait for Event/Appointment Time" steps to send out reminders or tasks to the team in the lead-up to the deadline.


How to use the Event Start Date Action?

Step 1: Add the Event Start Date/Time Action to Your Workflow

Navigate to the specific Workflow you want to modify.

Add the "Set Event Start Date/Time" action and prepare to customize the action.

Step 2: Customize the Event Start Date/Time

You usually have options for the type like Custom Field, Specific Date/Time, or Specific Day.

For Custom Fields, you can use pre-created Custom Date Field custom values to tell the workflow what event date you want to specify.

Please Note:

The "Set Event Start Date/Time" action often allows you to use a variety of date and time formats. Here are some formats that are commonly accepted:

MM-DD-YYYY HH:MM: This format includes the month (MM), day (DD), and year (YYYY), followed by the time in 24-hour format (HH:MM). For example, December 21st, 2021 at 8:30 AM would be written as 12-21-2021 08:30. 
DD-MMM-YYYY HH:MM: This format includes the day (DD), the abbreviated month (MMM), and the year (YYYY), followed by the time in 24-hour format (HH:MM). For example, October 21st, 2021 at 8:30 AM would be written as 21-OCT-2021 08:30.

Select the option you wish to use and fill out the necessary information. For example, if you select a specific date and time, you'll need to enter the exact date and time for the event.

Save the action to add it to your Workflow.

Step 3: Add a Wait for Event/Appointment Time Action

After setting the event start date/time, add a "Wait for Event/Appointment Time" action in your Workflow.

Set the action to wait until a certain number of days/hours/minutes before or after the event start date/time.

For example, if you set this to 2 days before, the Workflow will wait and send off the next action 2 days before the scheduled Event Start Date.

Please Note:

The Wait for Event/Appointment Time Action has some further configurations. 
Event / Appointment Time: This field typically relates to the event or appointment you've set with the "Set Event Start Date/Time" action. The "Wait for" action will hold until the specified time relative to this event or appointment. 
UNTIL - When: This configuration allows you to set the wait time until the next action occurs. This is based on a period of months, days, hours, and minutes. For example, you could set this to wait until 2 days and 3 hours before the event time. Values that exceed the max limit will be distributed to the larger units of time. For instance, if you input 60 minutes, it will be converted to 1 hour. 
IF THE TIMING OF THIS WAIT STEP IS ALREADY IN THE PAST, HOW SHOULD THE CONTACT PROCEED?: This configuration determines how the system should handle instances where the wait time is already past due. Options typically include: 
Move to the next step: The workflow will skip the wait and proceed to the next step in the workflow. 
Move to a specific step: The workflow will skip the wait and move to a specific step that you designate. 
Skip all outbound communication actions, till next wait or Event Start Date action: The workflow will skip any actions that involve sending communication (such as emails or SMS) until it encounters the next "Wait for Event/Appointment Time" or "Set Event Start Date/Time" action.

Save the action to confirm your changes.

Remember, these actions are repeatable within the workflow. You can add multiple "Wait for Event/Appointment Time" actions to create events leading to or following the Event Start Date.


FAQs

Q1: Can I use the "Set Event Start Date/Time" action for recurring events?

A1: Yes, it's typically possible to use this action for recurring events. You can set the Event Start Date/Time for the first instance and then use a "Go To" action to loop back to the start of the workflow for subsequent instances.

Q2: Can I set multiple Event Start Dates/Times in the same workflow?

A2: You can typically add multiple "Set Event Start Date/Time" actions within the same workflow. Each one could correspond to a different event or appointment, and you could then use corresponding "Wait for Event/Appointment Time" steps to create actions relative to each start date/time.

Q3: What happens if a contact enters the workflow after the Event Start Date/Time has passed?

A3: The behavior depends on your settings for the "Wait for Event/Appointment Time" action. If you set it to "Move to the next step" or "Move to a specific step", the contact would skip past the wait action. If you set it to "Skip all outbound communication actions, till next wait or Event Start Date action", they would skip outbound communication steps until they encounter the next wait or start date/time action.

Q4: Can I use the "Set Event Start Date/Time" action without a corresponding "Wait for Event/Appointment Time" action?

A4: It wouldn't be very useful when you could technically set an event start date/time without a subsequent "Wait for Event/Appointment Time" action. The main purpose of the "Set Event Start Date/Time" action is to establish a point in time that other actions can refer to.

Q5: If my workflow settings are set to respect Contact time zones, how does that affect the "Set Event Start Date/Time" action?

A5: If your workflow management tool supports time zones, you would typically set the Event Start Date/Time in your time zone, and the tool would then adjust it based on each contact's time zone. If the workflow doesn't have time zone information for a contact, it would typically use your account's time zone by default.

The Custom Webhook - LC Premium Action is a feature enabling real-time data exchange between your CRM and third-party services. It allows tailored requests with various HTTP methods, authorization, headers, and query parameters. This user-friendly tool ensures efficient and accurate workflows while considering API responses and server limitations.

Covered in this Article:

What is the Custom Webhook LC Premium Workflow Action?

Who is this feature useful for?

What are the benefits of this feature?


How to use the Custom Webhook LC Premium Workflow Action?

Fill Url: 

Select a Method

Select Authorization Method

Headers & Query Parameters:

Configure the data to be sent in the Custom Webhook:

Important points to be considered:


What is the Custom Webhook LC Premium Workflow Action?

The Custom Webhook - LC Premium Action is a powerful and flexible feature that enables real-time communication between your CRM system and third-party services. It allows you to configure and send custom data requests to specified URLs using different HTTP and authorization methods. This feature also supports adding headers, query parameters, and mapping custom values to create a tailored request structure that meets your needs. With autocomplete suggestions and user-friendly interfaces, the Custom Webhook streamlines data exchange and ensures accuracy in your workflows. However, it is crucial to consider API response success and server limitations when using this feature to prevent errors and disruptions in workflow execution.

Who is this feature useful for?

This feature is helpful for businesses and individuals who need to integrate their CRM systems with third-party services for seamless data exchange, automation, and enhanced functionality. It is particularly useful for marketers, developers, and IT professionals who want to streamline workflows, improve data consistency, and manage processes more efficiently across various platforms.

What are the benefits of this feature?

The benefits of the Custom Webhook - LC Premium Action feature include the following:

Seamless integration: Enables accessible communication between your CRM system and third-party services, improving data exchange and overall efficiency.

Flexibility: Supports various HTTP methods, authorization methods, headers, and query parameters, allowing you to create custom requests that suit your needs.

Time-saving: The user-friendly interface with autocomplete suggestions simplifies the data mapping and reduces manual effort.

Improved accuracy: Helps ensure data consistency and accuracy across different platforms, reducing errors and inconsistencies.

Real-time updates: Facilitates real-time notifications and updates, enhancing responsiveness and decision-making.

Workflow automation: Streamlines workflows by automating system data exchange, increasing productivity, and reducing manual tasks.

Scalability: Adaptable to various applications and industries, making it a valuable tool for businesses of different sizes and sectors.


How to use the Custom Webhook LC Premium Workflow Action?

Fill Url: 

You have the ability to send data requests to any URL of your choice without the need for coding or server operation.

Select a Method

You can choose any HTTP method that suits your needs, such as POST, GET, DELETE, or PUT.

Select Authorization Method

We support various types of authorization methods, allowing you to choose the one that suits your needs when accessing the webhook. 

Headers & Query Parameters:

In addition to sending a request body, our system allows you to include headers and query parameters when sending requests to a webhook.

Headers can be used to provide additional information about the request, such as authentication credentials, content type, and cache control. 

Query parameters, conversely, can be used to pass parameters to the webhook endpoint, allowing you to filter or modify the response data you receive.

Configure the data to be sent in the Custom Webhook:

The Custom Webhook premium feature allows you to map custom values in any structure that suits your requirements. Our user-friendly textbox provides autocomplete suggestions for all custom values, including inbound webhook variables.

This feature simplifies the mapping process and saves time by suggesting potential values that match your input. Additionally, it helps ensure accuracy and consistency in your data mapping.

Important points to be considered:

  • Successful execution of the Custom Webhook Action depends on the successful response of the referenced API. Therefore, if errors are sent back, those will reflect on the Contact's Workflow execution and cause the action to be Failed (and then skipped) or Retry with exponential backoffs. 
  • In addition to what was stated above in #1, make sure that the receiving server can handle the number of Executions that you are targeting, or else you might end up with errors due to limits being reached for server issues. The Custom Webhook Action will get fired as soon as the Contact reaches the step, so make sure to add Contacts into the Workflow with the receiving server's limits in mind.

Workflow Slack Premium Action is a feature that enables users to send automated messages to Slack channels and users, streamlining communication and improving team collaboration. The action offers three main events: sending a message to a user, a private channel, or a public channel. 

Covered in this Article:

What is the Slack Notification Premium Action?

What are some excellent Usage cases for this? Who is this useful for?

What are the benefits of this feature?


How to use the Workflow Slack Premium Action?

Send Direct Message to a User

Different Types of User Sources & their use cases

Assigned User (of contact)

Custom Email

Internal User

Slack User

Select a User Source

Message Content

Send a Public Channel message.

Choose a Public Channel

Message Content

Send a Private Channel message.

Choose a Private Channel

Message Content


What is the Slack Notification Premium Action?

Workflow Slack Premium Action is an advanced communication feature designed to automate and streamline messaging within Slack, a widely-used team collaboration tool. This feature allows users to send targeted messages to specific users, private or public channels within their Slack workspace. A user-friendly interface and customizable options ensure effective communication by enabling users to set up and schedule notifications based on their needs.

The action offers three main events:

Sending a message to a user: Users can choose from four options to send a direct message to the right person: Assigned User, Custom Email, Internal User, or Slack User. Each option serves a unique purpose in determining the Message's recipient, ensuring accurate and efficient communication.

Sending a message to a private channel: Users can select a private channel within their workspace to send messages, which will appear as if sent manually by the User who created the Slack integration. This allows for secure communication within a select group of team members.

Sending a message to a public channel: Users can choose a public channel within their workspace to broadcast messages, making information accessible to all workspace members.

What are some excellent Usage cases for this? Who is this useful for?

Workflow Slack Premium Action is helpful for organizations and teams that rely on Slack for communication and collaboration. It helps automate messages and notifications, streamlining the information flow within the workspace. Some good usage cases for this feature include:

  • Project Management: Automatically notify team members when new tasks are assigned, project deadlines are approaching, or tasks are marked as complete. This can help ensure everyone stays on track and knows their responsibilities.
  • Sales and Marketing: Notify the sales team of new leads, opportunities, or closed deals, allowing them to act quickly and efficiently. Marketing teams can also benefit from automated notifications about campaign performance, content publication, or social media engagement.
  • Customer Support: Send automated notifications to the support team when new support tickets are created, escalated, or resolved, ensuring a timely response and efficient issue resolution.
  • Human Resources: Notify HR and relevant team members of employee onboarding, training sessions, performance reviews, or policy updates, keeping everyone informed and engaged.
  • IT and Development: Send alerts to the IT or development team when new bugs are reported, system outages occur, or software updates are released, allowing them to address issues promptly and maintain system stability.
  • Company-wide Announcements: Share important news, updates, or reminders with the entire organization through public channels, ensuring that everyone stays informed and engaged.

What are the benefits of this feature?

Workflow Slack Premium Action offers several benefits to organizations and teams using Slack for communication and collaboration:

  • Improved efficiency: By automating messages and notifications, teams can save time and reduce manual effort, allowing them to focus on more critical tasks and improving overall productivity.
  • Enhanced communication: This feature ensures that important information is shared with the right people at the right time, reducing communication gaps and misunderstandings within the team.
  • Streamlined collaboration: Workflow Slack Premium Action promotes better collaboration by informing team members about project updates, task assignments, and deadlines, helping everyone stay on the same page.
  • Increased accountability: Automated notifications for task assignments, updates, or deadlines encourage team members to take responsibility for their work, leading to better overall performance and accountability.
  • Customization and flexibility: The feature offers a variety of customization options, allowing users to tailor their messages and notifications to their specific needs, making communication more relevant and effective.
  • Real-time updates: Workflow Slack Premium Action enables teams to receive instant notifications about critical events or updates, allowing them to respond quickly and make data-driven decisions.
  • Centralized information: By sending messages to specific channels, this feature helps to centralize information within the organization, making it easier for team members to access and reference important updates and data.
  • Scalability: Workflow Slack Premium Action can quickly adapt to the changing needs of a growing organization, ensuring that communication remains efficient and streamlined as the team expands.


How to use the Workflow Slack Premium Action?

The action offers three main events: 

  • Sending a message to a user
  • Sending a message to a public channel
  • Sending a message to a private channel

 Send Direct Message to a User

You will have four options if the event is Send Direct Message to User.

  • Assigned User - Assigned User of the Contact
  • Custom Email - Add a specific email to search your Slack Workspace for the User and then send out the Message
  • Internal User - Users from your account
  • Slack User - Directly search your Slack Workspace Users by name.

Different Types of User Sources & their use cases

Assigned User (of contact)

This is used to send out notifications for the assigned User of the contact. In this case, the User's email (in settings>My Staff> User Info) for the User Assigned to the contact is used to find the Slack user.

Custom Email

This is used for all the cases where you need a dynamic user to send notifications to. The custom email that is filled in is used to find the matching of a Slack user.

This is for all those cases where you do not have the User predefined. Either type in the email or select from a list of custom variables using the custom variable picker.  


Internal User

Use this option to send a message to one of the account users. You were typically used to send notifications to particular users responsible for certain sections of your business. Say, sending out information on a successful opportunity won to your finance head. The email of the Internal User selected is used to find the Slack user here.

Slack User

This is as simple as it sounds. Send a direct message to any Slack user of your workspace. 

Please note:

Slack allows only a limited number of users to be fetched simultaneously. So if you don't see your user by typing out the name, please hit the load more button. This will keep searching until you have the required user found. If the user is at the bottom of the list, you might have to hit the load more button several times. This is only for the workspaces having more than 1000 users.

Select a User Source

To start, select one of the four User Sources provided. 

Message Content

Insert Message to send Direct Message to a User. For more formatting options, check here.
You can use the extensive custom variable picker to send information about a contact or any CRM-related information.


Send a Public Channel message.

If the event is Send Public Channel Message, you must select which Public Channel you want to send messages to. 

Choose a Public Channel

Select the desired channel to send the Message.

Please note:

Slack allows only limited number of Public Channels to be fetched at once. So if you don't see the desired channel by typing out the name, please hit the load more button. This will keep searching until you have the required channel found. If the channel is in the bottom of the list you might have to hit the load more button a couple of times. This is only for the workspaces having more than 1000 channels.

Message Content

Insert Message to send to the Public Channel. For more formatting options, check here


You can use the extensive custom variable picker to send out information about a contact or any CRM-related information.


Send a Private Channel message.

If the event is Send Private Channel Message, you must select which Private Channel you want to send messages to. 

Choose a Private Channel

Select the desired channel to send the message.

Please Note:

It's important to be aware that when sending messages to a Private Channel, these messages will be sent as the User who created that Slack Integration, not as the Bot. Therefore, it will appear as if it was sent manually by the User itself.

Slack allows only limited number of Private Channels to be fetched at once. So if you don't see the desired channel by typing out the name, please hit the load more button. This will keep searching until you have the required channel found. If the channel is in the bottom of the list you might have to hit the load more button a couple of times. This is only for the workspaces having more than 1000 channels. 

Message Content

Insert Message to send to the Private Channel. For more formatting options, check here

You can use the extensive custom variable picker to send out information about a contact or any of the CRM related information.

This article explains workflows' "Update Contact Field" and "Clear Field Data" actions. The former allows updating a contact field with a new value, either static or dynamic, while the latter clears the existing value of a custom contact field. Both actions are currently supported for Contact Custom Fields only.

Covered in this Article

What is the Update Contact Field Action in Workflows?

What are some good usage cases for this?

How to use this action?

Select Update/Clear Field Data

Update Field Data

Clear Field Data


What is the Update Contact Field Action in Workflows?

The update contact field action in workflows allows you to update the value of a specific field for a contact. With this action, you can specify a new value for the field, and the contact's existing field value will be replaced with the new value. However, with the new feature, you can also clear the field, i.e., empty the input field or reset it to the default value.

Please Note:

It's important to note that the clear field data feature currently supports only the Contact Custom Fields. 


You can use this action to update or clear multiple fields with static or custom values anywhere in the workflow. The fields can be dynamically updated in workflows wherever they are being used.


What are some good usage cases for this?

Here are some excellent usage cases for the "Update Contact Field" and "Clear Field Data" actions in workflows:

Lead Management: You can use the "Update Contact Field" action to update the lead source field for a contact based on the referral source. This will help you to understand where your leads are coming from and optimize your marketing efforts accordingly. You can also use the "Clear Field Data" action to remove outdated information from your lead records.

Personalization: You can use the "Update Contact Field" action to personalize your email marketing campaigns by updating contact fields such as first or last name. This will help to increase engagement and conversion rates. You can also use the "Clear Field Data" action to remove incorrect or outdated information from contact fields.

Sales Pipeline Management: You can use the "Update Contact Field" action to update the stage of a contact in your sales pipeline based on their progress. This will help you to track and manage your sales pipeline more effectively. You can also use the "Clear Field Data" action to remove contacts from your pipeline if they are no longer a good fit.

Custom Integrations: You can use the "Update Contact Field" action to update custom contact fields based on data from other integrations. For example, you can use Zapier to update a custom field with data from a Google Sheet or form submission on your website. You can also use the "Clear Field Data" action to reset custom fields based on specific triggers or conditions.


How to use this action?

Select Update/Clear Field Data


Update Field Data

Updates the selected field with the provided value. 

The "Update Contact Field" action in workflows allows you to update the value of a specific field for a contact. This feature is useful when updating a contact field with a new value, such as a phone number, email address, or custom field.

To use the "Update Contact Field" action, you must add it to your workflow, select the contact field you want to update and specify the new value you want to set for the field. You can update the field with a static value, a fixed value that you specify in the workflow, or a custom value, which is a value dynamically generated based on other data in your workflow.

For example, if you have a custom field called "Lead Source," you can use the "Update Contact Field" action to update the value of this field for a specific contact. You might want to update the field with a static value like "Website," indicating that the lead came from your website. Alternatively, you might want to update the field with a custom value that is dynamically generated based on the referral source of the lead.

Once the "Update Contact Field" action is executed in the workflow, the contact's existing field value will be replaced with the new value specified in the action. It's important to note that you can use this action to update multiple fields with static or custom values anywhere in the workflow.

Clear Field Data

Resets the selected field to the default value (clears the data). 

Clearing contact fields is a feature that allows you to remove the existing value of a contact field, effectively resetting it to an empty value. This feature is useful when removing a previously entered value from a contact field. When you use the clear field data feature, the contact field value is set to NULL or empty.

Please Note:


It's important to note that the clear field data feature currently supports only the Contact Custom FieldsThis means you can use only clear custom fields you've created for your contacts, not standard fields like first name, last name, or email.

To clear a contact field in a workflow, add the "Update Contact Field" action, select the contact field you want to clear and add a filter for which field you want to clear. Once the workflow is executed, the contact field will be cleared of its previous value and set to an empty value.

It's important to use this feature with care, as clearing a contact field may result in the loss of valuable data. Therefore, it's recommended to use this feature only when necessary and ensure that you have a data backup before clearing any contact field.

The Payment Received trigger is designed to act as a centralized mechanism for capturing all incoming payments across the CRM, including one-time purchases, subscription charges, invoices, and more. It can be customized with filters, such as source type and transaction status, to target specific use cases. This trigger helps businesses automate tasks, streamline processes, and efficiently respond to real-time customer transactions.

Covered in this Article

What is the Payment Received Workflow Trigger, and what does it do?

What are some excellent usage cases for this, along with their benefits?

How to use the Payment Received Trigger?

Workflow Trigger Filters for Payment Received Workflow Trigger

If/Else Conditions for Payment Received Workflow Trigger

Custom Values for Payment Received Workflow Trigger


FAQs

Will this trigger include subsequent subscription payments as well? 

How can I achieve the trigger for successful subsequent subscription transactions?

What does the Customer present/first transaction mean and the Customer not present/subscription transaction?

Will failed payments also be captured in this trigger? 

I have configured the trigger and selected a specific product in the filters. Does this mean that the trigger will fire off when that product is sold anywhere?

What is the sub-source filter?


What is the Payment Received Workflow Trigger, and what does it do?

The Payment Received trigger automates processes and actions based on incoming payments when used in a workflow. It can be configured to respond to specific payment events, such as successful or failed transactions or particular products and payment sources. Here are some detailed functionalities and use cases:

Workflow automation: The trigger initiates the Workflow whenever a payment is received, allowing for automated actions like sending confirmation emails, generating invoices, or updating customer records in a CRM.

Customization with filters: Users can apply various filters to the trigger, such as transaction type, payment source, or product. This enables the creation of targeted workflows for specific scenarios, like subscription renewals, or failed payments.

Real-time response: The trigger operates in real-time, enabling businesses to respond quickly to customer transactions. This can help improve customer satisfaction by providing immediate feedback or resolving issues promptly.

Conditional actions: By using if/else conditions in the Workflow, different actions can be executed depending on the payment characteristics, such as the amount, source, or transaction status.

Reporting and analytics: The trigger can capture payment data for analysis and reporting purposes. By monitoring incoming payments and their attributes, businesses can gain insights into sales performance, customer behavior, and potential areas for improvement.

What are some excellent usage cases for this, along with their benefits?

The Payment Received trigger offers numerous usage cases and benefits, helping businesses automate processes, improve customer experience, and gain insights from payment data. Some common usage cases and their benefits include:

  • Automated payment confirmation:
    Usage Case: Send customers automated confirmation emails or messages when Payment is processed.
    Benefits: Enhances customer experience by providing instant payment confirmation, reduces manual tasks, and helps maintain clear communication with customers.

  • Subscription management:
    Usage Case: Automatically update subscription status in the system when a subscription payment is successful or failed.
    Benefits: Ensures accurate and up-to-date subscription information, streamlines subscription management, and reduces manual intervention.

  • Dunning management:
    Usage Case: Automatically trigger dunning email sequences for customers with failed subscription payments.
    Benefits: Improves revenue recovery by addressing payment failures promptly, reduces churn, and enhances customer retention.

  • Customer segmentation:
    Usage Case: Use payment data to create customer segments based on purchasing behavior, such as high-value customers or frequent buyers.
    Benefits: Enables targeted marketing campaigns, helps identify upsell or cross-sell opportunities, and facilitates personalized customer experiences.

  • Payment failure resolution:
    Usage Case: Automatically notify customer support or sales teams to address and assist the Customer when a payment failure occurs.
    Benefits: Enhances customer support, improves customer satisfaction, and helps resolve payment issues quickly.

  • Sales performance tracking:
    Usage Case: Monitor payment data to track sales performance and identify trends, such as best-selling products, seasonal fluctuations, or customer preferences.
    Benefits: Provides valuable insights for strategic decision-making, helps optimize sales strategies, and drives revenue growth.

  • Integration with accounting systems:
    Usage Case: Automatically update accounting records with payment information using outbound webhooks, such as invoicing, revenue recognition, or tax calculations.
    Benefits: Ensures accurate financial reporting, streamlines accounting processes, and reduces manual data entry.

  • Handling trial period transactions: The Payment Received trigger effectively manages transactions involving trial periods for subscription products, such as a 14-day trial. In this example, when a customer signs up for the trial and pays $0 upfront, the trigger categorizes this as a customer present transaction since they are on-session and entering their payment information. After the 14-day trial ends, the customer is charged $100 automatically without entering their payment details again. This subsequent transaction is considered a customer, not present transaction, as it occurs in the background. The Payment Received trigger allows businesses to track and automate workflows around trial period transactions accurately.

    Benefits: By efficiently handling trial period transactions, businesses can enhance customer experience, improve subscription management, and reduce manual intervention, increasing customer satisfaction and retention.

  • Integrating Text2Pay links: The Payment Received trigger supports Text2Pay links as a payment source, enabling businesses to automate workflows for payments received through text message-based methods. By incorporating Text2Pay links in the trigger's configuration, businesses can effectively manage and respond to these transactions, improving the overall customer experience and streamlining payment processing.

    Benefits: Utilizing Text2Pay links with the Payment Received trigger allows businesses to reach a wider audience, expedite payment processing, and simplify customer communication, ultimately leading to increased revenue and customer loyalty.


How to use the Payment Received Trigger?


Inside a workflow, add a workflow trigger called Payment Received.

Please Note:

Choosing a filter allows you to choose its respective Sub-filters the next time you add a filter to the same workflow trigger. 

Workflow Trigger Filters 

for Payment Received Workflow Trigger

You can then make your Workflow trigger more specific using filters. Here is a table of all the available filters and sub-filters.

Trigger
Filter
Options at Filter Level
Sub-Filter Level 1
Options at Sub-Filter Level 1
Operators
Payment Received
Payment Source
Invoice
Sub-Source
Text2Pay link
is, is not
One-time invoice
Recurring template
Funnel/ Website
 
 
Sub-Source
One-step order form
Two-step order form
Upsell
Transaction type
Customer present/first transaction
 
Customer not present/subscription transaction
Calendar
Calendar
Calendar names
Global Product
Global product Names
Price
Prices Names as per selected Global Product
Payment status
Success
---
Failed

If/Else Conditions for Payment Received Workflow Trigger

Once you have added your desired set of Filters and Sub-Filters to your workflow trigger, you can add an If/Else Condition for Payment if you need to branch out the Workflow based on certain conditions. 

This Table explains the possible If/Else Conditions and their branches.

If/Else Option
Action
Operator
Options
Payment
Product
is, is not
Global product Names
Funnel/Website
Funnel/Website names
Calendar
Calendar names
Source
Invoice, Funnel, Website, Calendar
Payment status
success/failed
Amount
Equal to, is not equal to, Greater than, Greater than or equal to, Less than, Less than or equal to, is not empty, is empty.
Amount paid

Custom Values for Payment Received Workflow Trigger

When you use the Payment Received Workflow trigger, you have access to a set of Custom Values that you can populate within SMS, Emails, Internal Notifications, etc. This Table explains the custom values in detail.

Custom Values Category
Custom Values Name  (Custom Value Group Name) 
Custom Values within Group
Value
Payment
Source
 
{{payment.source}}
Currency Symbol
{{payment.currency_symbol}}
Currency Code
{{payment.currency_code}}
Customer (Custom Values Group)
ID
{{payment.customer.id}}
First Name
{{payment.customer.first_name}}
Last Name
{{payment.customer.last_name}}
Name 
{{payment.customer.name}}
Email
{{payment.customer.email}}
Phone
{{payment.customer.phone}}
Full Address
{{payment.customer.address}}
City
{{payment.customer.city}}
State
{{payment.customer.state}}
Country
{{payment.customer.country}}
Postal Code
{{payment.customer.postal_code}}
Invoice (Custom Values Group) 
Name
{{payment.invoice.name}}
Number
{{payment.invoice.number}}
Issue Date
{{payment.invoice.issue_date}}
Due Date
{{payment.invoice.due_date}}
URL
{{payment.invoice.url}}
Recorded By
{{payment.invoice.recorded_by}}
Sub-Total
 
{{payment.sub_total_amount}}
Discount Amount
{{payment.discount_amount}}
Coupon Code
{{payment.coupon_code}}
Tax Amount
{{payment.tax_amount}}
Created On
{{payment.created_on}}
Total Amount
{{payment.total_amount}}
Transaction ID
{{payment.transaction_id}}
Status 
{{payment.payment_status}}
Gateway
{{payment.gateway}}
Card Last 4 Digits
{{payment.card.last4}}
Card Brand
{{payment.card.brand}}
Method
{{payment.method}}

FAQs

Will this trigger include subsequent subscription payments as well? 

Yes, the trigger will fire whenever a payment is received from the end customer directly on an order form submission and when the subscription is charged in the background.

How can I achieve the trigger for successful subsequent subscription transactions?

Since the subscriptions can be created in a funnel or website, we can create a trigger for Payment Received and apply the following filters for achieving the use case. The source type is Funnel/Website. The transaction type is "Customer not present/subscription transaction."

The payment status filter can filter successful or failed payments per the use case.

What does the Customer present/first transaction mean and the Customer not present/subscription transaction?

We are categorizing the transaction type into two categories

  • Customer present /first transaction - This includes the transactions where the end customer is on-session and making the Payment. This consists of all one-time purchases and the first order placement for a subscription product.
  • Customer not present / subscription transaction - This includes the transaction types which run in the background after a subscription has already been created. For example, if a customer purchases a recurring product with a 14-day trial period. The transaction is done while purchasing the recurring product ($0 transaction in this case) would fall into the Customer present/first transaction. After 14 days, when the trial period is over, and you charge $100 for the recurring product, the $100 transaction would fall into the Customer not present/subscription transaction category.

Will failed payments also be captured in this trigger? 

Yes, by default, without any filters, the trigger runs upon successful and failed payment attempts. For specific use cases around success/failed payments only, we can apply the "Transaction status" filter and set it to either success/failed as per the use case.

I have configured the trigger and selected a specific product in the filters. Does this mean that the trigger will fire off when that product is sold anywhere?

If you have configured the trigger and set the filter for a specific product, it will fire off only when that product is sold in funnels/website/invoices. Using the transaction status filter, we can define whether the trigger should work when the purchase is successful or the purchase is a failure.

What is the sub-source filter?

When you select a source like funnels/websites/invoices, they can have sub-sources, like a payment from the funnel can be coming either via a one-step order form, a two-step order form, or an upsell. You can use these sub-source filters to define the Payment's origin.

Social Planner

If you’re not sure what type of Instagram profile you have, here’s how to find out:


1. In the Instagram app, go to your profile, and then select the profile menu in the top right of the screen.

2. Select Settings from the list, and then select Account.

3. On the Account page, scroll to the bottom. The options you see there tell you what type of Instagram profile you currently have.

  • Personal profiles show the Switch to Professional Account option.
  • Creator profiles show the Switch account type > Switch to a personal account and Switch to business account options.
  • Business profiles show the Switch account type > Switch to a personal account and Switch to creator account options.

Recurring posts provide a streamlined way to create evergreen content across various social platforms, scheduled daily, weekly, monthly, or yearly. Through a simple process, users can generate quality content using AI, schedule it with flexible time settings, and even edit parent and child posts. Take control of your content strategy by utilizing this feature, but be mindful of platforms like Twitter, which may flag repetitive content.

Covered in this Article


What is this feature?


The recurring posts feature in the Social Planner is designed to help users maintain consistent and automated social media engagement by scheduling evergreen content regularly. Here's a detailed breakdown of how it works:

Flexible Scheduling: Users can set the posts to repeat every day, week, month, or year. They can select specific days of the week, date ranges, and post times according to their preferences.

Content Creation: Users can generate quality content using AI, allowing them to create posts that resonate with their audience quickly.

Editing Options: The feature allows for edits to both parent and child posts. If changes are made to the parent post, they will be replicated in all child (scheduled) posts. Editing a child's post will not impact the parent's post.

Recurring Posts Tab: The parent post is added to the Recurring Posts tab once scheduled. Users can access the edit function to change all recurring posts' time and date ranges.

Scheduled Posts: Individual scheduled posts appear separately, and users can edit each as needed without affecting the others.

Platform Consideration: It's important to be mindful of the policies of specific social platforms. For example, Twitter may flag content as repetitive if the recurring post feature is used excessively.

Long-term Strategy: This feature allows for creating long-term content strategies, helping businesses stay in front of their audience without manually posting content regularly.

Images and Media: Along with the text, users can add images or other media from their library or, through image AI, visually enrich the content.

Monitoring and Management: Users can track and manage all their recurring posts through a simple interface, providing control over their social media content.

The recurring posts feature empowers users to take a proactive and automated approach to social media management, ensuring a steady stream of fresh content without constant manual effort. It offers great flexibility and control, making it a powerful tool in a modern marketer's toolkit.

Usage Cases

Promoting Seasonal Offers: A retail store can set recurring posts to promote seasonal sales, offers, or specific products at the beginning of each season. They can easily plan this for the entire year and forget the manual posting process.

Daily Inspirational Quotes: A motivational speaker or life coach can schedule daily inspirational quotes to engage their audience and reinforce their brand messaging. This consistency helps in keeping the audience connected and engaged.

Weekly Tips or Tutorials: A tech company or educational platform can set up weekly tutorials or tips to share with their followers. This regular content provides value and helps establish the company as an expert.

Celebrating Recurring Events: A company can acknowledge and celebrate recurring events like employee birthdays, anniversaries, or national holidays, ensuring that these posts are never missed and adding a personal touch to the company's social media presence.

Monthly Product Showcases: A manufacturer or distributor can showcase different products every month, providing information, features, and benefits to educate potential customers.

Content Repurposing: For businesses with a rich content library (such as blogs or podcasts), recurring posts can periodically share or reshare this content to new followers or those who might have missed it the first time.

Reinforcing Brand Campaigns: If a company has a year-long brand campaign or slogan, recurring posts can consistently remind followers of the brand's core message, ensuring that it stays fresh in their minds.

Reminder for Regular Events: For organizations hosting regular events like webinars or community meet-ups, recurring posts can act as reminders, ensuring participants have the information they need to join.

Automating Social Engagement in Different Time Zones: For global businesses, recurring posts can schedule content at optimal times for different time zones, ensuring the content reaches the broadest possible audience.

Compliance and Regular Announcements: In industries where regular compliance updates or announcements are necessary, recurring posts can ensure that the necessary information is shared with stakeholders at the required intervals.

Celebrating Historical Milestones: Museums, historical societies, or educational institutions can use this feature to share historical facts or milestones on the corresponding dates, providing educational content to their followers.


How to use this feature?

How to create a Recurring Post?

  • Go to Marketing > Social Planner.
  • Create a new post for social platform on which you would like to create content.

Please Note:

On Twitter, this content may be flagged as repetitive when compared to other social media platforms.

Create New Post with Recurring Schedule 


Day  - The user will have to choose the date and time of posting on repeat everyday.


Week - Users will have to choose the day of the week when they would like to repeat schedule between the date range and post time.


Month - The user will have to choose the date and time of posting on repeat once in a month.


Year -The user will have to choose the date and time of posting on repeat once in the year.

Once the recurring post is scheduled, the parent post will be added in the Recurring Posts tab with the edit function to change the time and date range. For example, if four posts are scheduled using a recurring post, the parent post will show in recurring post and one post will appear in the scheduled post. 

If you change the content on the parent post, it will replicate in the child's scheduled post. If you change child-scheduled post content, it will not impact the parent post.

Important things to note:

Avoid Repetitiveness: Though recurring posts can save time, please ensure content isn't overly repetitive, especially on platforms like Twitter that might flag it as spam. Variation and customization can make each post feel fresh.

Review Regularly: Please review and update recurring posts regularly to ensure relevance, especially if there have been changes to products, offers, or brand messaging.

Consider Audience Engagement: Please note that interaction from followers might differ across various posts. Monitoring and responding to these interactions can provide insight and maintain engagement.

Compliance with Platform Policies: Different social media platforms have different policies regarding recurring and automated posts. Please be aware of and comply with each platform's guidelines to avoid potential issues.

Utilize Rich Media: Images, videos, or GIFs can make recurring posts more engaging. Please consider integrating rich media into the content to grab attention.

Time Zone Considerations: If targeting a global audience, please consider scheduling posts according to the different time zones of your target demographics to maximize reach.

Content Backup: Please ensure a backup of all recurring content. Any technical issues could lead to loss of content, and having a backup will prevent unnecessary work in recreating it.

Monitoring Performance: Please note that analyzing the performance of recurring posts helps understand what resonates with the audience. Regularly monitoring insights can guide future content strategy.

Avoiding Over-Scheduling: While it's tempting to schedule a lot of content in advance, please avoid over-scheduling, as it may lead to a lack of spontaneity and real-time engagement with your audience.

Sensitive Issues and Crisis Management: Please be cautious with recurring posts during sensitive times or crises. Scheduled posts that may be inappropriate during unexpected events must be reviewed and managed accordingly.

Integration with Other Campaigns: If ongoing or planned marketing campaigns exist, please ensure that the recurring posts align with the overall marketing and branding strategies.

Accessibility Considerations: Please include accessible content, such as video captions or alternative text for images, to ensure that all followers, including those with disabilities, can engage with the posts.

Legal and Ethical Considerations: Please be mindful of intellectual property rights, permissions, and other legal considerations when using images, quotes, or other content within recurring posts.

Experiment and Iterate: Recurring posts are a tool, and like any tool, they require experimentation to find the most effective way to use them. Please don't be afraid to try different strategies and iterate based on what you learn.


FAQs

Q: Can I set recurring posts for specific holidays or annual events?

A: Yes, you can schedule recurring posts for specific dates, allowing you to automate posts for holidays or annual events like company anniversaries.

Q: What happens if I edit the parent post of a recurring schedule?

A: Editing the parent post will replicate the changes in child scheduled posts. However, changes made to individual child posts will not affect the parent post.

Q: Can I mix media types, like images and videos, in my recurring posts?

A: Yes, you can include various media types, such as images, videos, or GIFs, within the recurring posts to make them more engaging.

Q: How does the recurring post feature interact with different time zones?

A: You'll need to set the time for your recurring posts considering the time zone of your target audience. Be mindful of global audiences if applicable.

Q: Is there a limit to how far in advance I can schedule recurring posts?

A: Depending on the specific settings and platform guidelines, you may be able to schedule recurring posts for days, weeks, months, or even years in advance.

Q: Will Twitter's repetitive content policy affect my recurring posts?

A: Yes, Twitter might flag recurring posts as repetitive content. It's essential to be mindful of this and create variations in content to comply with Twitter's policies. Click here for more details.

Q: Can I pause or temporarily stop a recurring post series?

A: You cannot pause or temporarily stop a recurring post series

Q: What if I want different recurring posts for different social platforms?

A: You can create unique recurring posts tailored to each social platform using the Customize Each Post functionality, allowing you to align the content with each network's specific character limits and guidelines.

Q: Can recurring posts be part of a larger campaign with non-recurring content?

A: Absolutely! You can integrate recurring posts with other marketing strategies and campaigns to create a cohesive and consistent brand message.

Q: How can I ensure my recurring posts are accessible to all users, including those with disabilities?

A: Incorporating accessibility features like captions, alt text, and other inclusive practices can make your recurring posts accessible to a broader audience.

Q: How do I avoid making recurring posts feel too automated or impersonal?

A: Mixing recurring posts with real-time, personalized content and engaging with your audience can help maintain a human touch in your social media presence.

Harness the power of the Instagram Story Post Composer in Social Planner. This integrated tool allows you to design and schedule your Instagram stories expertly. Use it to manage your digital marketing, drive engagement, and promote your brand seamlessly and efficiently.

Covered in this Article

What is the Instagram Story Post Composer?

What are some practical usage cases for this feature?


How to use this feature?

Before you begin

Create your Instagram Story


FAQs

Q1: Can I add text or stickers to my Instagram Stories through the Instagram Story Post Composer in Social Planner?

Q2:  Can I tag people or businesses in my stories through Social Planner?


What is the Instagram Story Post Composer?

The Instagram Story Post Composer is a robust feature embedded in the Social Planner. Its main function is to allow users to manage their Instagram stories in a way that efficiently fits into their overall digital marketing strategy.

This feature caters specifically to Instagram Professional accounts, providing the ability to create and schedule content directly through Social Planner. Whether you're looking to post immediately or pre-plan your story posts, this tool offers the flexibility you need.

The Post Composer supports media uploads, allowing you to incorporate up to 10 images or videos per story. This means you can add depth to your narratives and engage your audience with diverse and dynamic content. Be mindful of the technical specifications: the maximum file size for images is 8 MB, and videos must be under 60 seconds.

Moreover, the Instagram Story Post Composer provides a useful 'draft' function. If you're creating a story but need to pause your work, you can easily save it as a draft and return to it later. This is especially useful for businesses managing their content pipeline and seeking to maintain a consistent posting schedule.

What are some practical usage cases for this feature?

Here are a few practical usage cases for the Instagram Story Post Composer in Social Planner:

  • Product Launch: Suppose you're a clothing brand releasing a new line. You can create a series of Instagram stories unveiling the designs, schedule them in the Post Composer, and ensure they are published in sync with your launch date.
  • Event Promotion: If you're hosting an event, you can design and schedule a series of stories counting down to the event, providing information about it, and creating excitement among your followers. This keeps your audience engaged and informed leading up to the event.
  • Content Consistency: Regular posting is key to audience engagement. If you have a busy week coming up and won't have time to create content daily, you can use the Post Composer to plan and schedule your stories in advance, maintaining your usual posting frequency.
  • Time Zone Management: If your audience is spread across different time zones, you can schedule your stories to be posted when your followers are most likely to be active, even in the middle of your night.
  • Flash Sales: If you're running a time-sensitive promotion or flash sale, you can schedule stories announcing the start and end of the sale, ensuring your followers are aware of the limited time frame.
  • Saving Drafts: If you have an idea for a story but it's not fully formed, or it's not the right time to post it, you can save it as a draft in the Post Composer. This way, you won't forget your idea and can return to finish it when ready.

How to use this feature?

Before you begin

Make sure you’ve already done the following:

  • Added an Instagram Professional account [Publishing story to personal and creator account is not supported]
  • Uploading the images and videos to the Media Library.


Create your Instagram Story

01

Click "Marketing"

Go to the Marketing section.

preview
02

Go to Social Planner

Access the Social Planner.

preview
03

Click "New Post"

Create a new post.

preview
04

Click "Create New Post"

Click on the "Create New Post" button.

preview
05

Under Post to, Click "Select a social account"

Choose a social account.

preview
06

Mark your Instagram Professional Account(s)

Please Note:

If you select other social accounts, the story will not be visible. You must select one or multiple Instagram Professional accounts to publish to Instagram.
preview
07

Under Content Type, Click "story"

Choose the "story" option.

preview
08

Click on Upload image or video to add your media

Select Upload media to attach up to 10 images or videos to your story. 

Please Note:

Adding Captions or text to your Content is not supported for Instagram Story through third-party API. The maximum image file size is 8 MB, and the maximum video length is 60 seconds.
preview
09

Click on the arrow next to Post to choose when you want to post or send the post for approval.

Schedule the post.

preview
10

You can click on Save for Later to save your post as a draft for later

Click on the designated area.

preview


FAQs

Q1: Can I add text or stickers to my Instagram Stories through the Instagram Story Post Composer in Social Planner?

A1: Text and stickers can't be added to Instagram stories through third-party APIs like Social Planner. You would need to add these elements directly to the Instagram app. 

Q2:  Can I tag people or businesses in my stories through Social Planner?

A2: Tagging people or businesses in Instagram stories through third-party tools is impossible. This feature is generally limited to the Instagram app itself. However, Instagram's policies and features may change, so we recommend checking Instagram's official API documentation (https://developers.facebook.com/docs/instagram/sharing-to-stories) or contacting our support team for the most recent information.

Want to enhance your social media marketing and expand your reach on Instagram? Look no further than The Social Planner! We're here to guide you through the latest trend on the platform: Instagram reels. 

With reels, you can easily create brief yet captivating videos to connect with your audience and boost your brand's visibility. Showcase your products or services in a fun and creative way, drawing in potential customers and driving traffic to your website.

Don't let this opportunity slip away - start utilizing the power of Instagram Reels with The Social Planner today!

Prequsisties before continuing with this guide

- Ensure you have already added an Instagram Professional account [Publishing Reels to a personal or creator account is NOT available]

- Uploading Images and videos in Media Library prior to creating the reel

Covered in this article:

Prequsisties before continuing with this guide

How to make an Instagram Reel using the Social Planner

Supported Content for Instagram Reels


FAQs


How to make an Instagram Reel using the Social Planner


Step 1: Go to the "Marketing" tab > "Social Planner" > "New Post."


Step 2: Under Publish, select your Instagram account.

If you select another social account, Reels will not be visible. For publishing to Instagram, you must select one or multiple Instagram Professional accounts.


Step 3: Select Reels as your Instagram content type (See image below)


Step 4: Create your reel by uploading up to 10 images or videos


Step 5: Select "Post Now" or "Schedule for Later" - You can also save your story as a draft.

If your post was scheduled, you will see your reel under the "schedule posts" tab


Supported Content for Instagram Reels

- Suggested video size upto 1GB and for thumbnail is 8MB.
- Aspect Ratio - The dimension should be recommended of 9:16.
- Duration: 15 mins maximum and 3 seconds minimum
- Format: MOV or MP4

FAQs

Can I use Instagram Reels with any Instagram account?

No, Reels can only be used with Instagram Professional accounts. Reels will not be visible for publishing if you select another type of account.

What types of content can I include in an Instagram Reel?

Using The Social Planner, you can include up to 10 images or videos in your Instagram Reel.

Is there a time limit for Instagram Reels?

Yes, Instagram Reels have a duration limit. Your reel should be between 3 seconds (minimum) and 15 minutes (maximum) long.

Can I schedule my Instagram Reel for later publication?

Yes, you can schedule your Instagram Reel for later publication using The Social Planner. After creating your reel, you can choose "Schedule for Later," and it will be saved for future posting.

Can I use Instagram Reels for personal or creator accounts?

No, Instagram Reels can only be published from Instagram Professional accounts. Personal or creator accounts do not have access to this feature.

How can Instagram Reels help me connect with my audience?

Instagram Reels provide a fun and creative way to showcase your products or services, making engaging and connecting with your audience through visual storytelling easier.

Is there a limit to how many Instagram Reels I can create using The Social Planner?

There is no specific limit to the number of Instagram Reels you can create using The Social Planner. You can use the feature as often as you like to engage your audience and promote your brand.

For a content marketing campaign, knowing exactly what kind of image and video format to post, and how often is absolutely important. Here are the best sizes for sharing images on social media:


Image


Format
Maximum File Size
Aspect Ratio
No. of Images
MultiMedia 
PinterestPNG JPG
10MB
 1 Image
Not Allowed
Facebook Pages 
PNG JPG GIF
10MB
Recommended - need to keep the Width*Height - 1280 x1080

 
Minimum 
600 x 315 pixels
Unlimited Image(s) - Recommend to post 10 Image(s) or less
Not Allowed
Instagram
Business Profile
PNG JPG
8MB
Square, or between 1.91:1 and 4:5
Landscape: 1080 x 566 pixels
Portrait: 1080 x 1350 pixels
Square: 1080 x 1080 pixels
10 Image(s)
Multimedia format is allowed for carousal- can add image(s) and video(s) together.
Linkedin Profile and Pages
PNG JPG GIF
8MB 
Maximum
6012 pixels x 6012 pixels
9 Image(s)
Not Allowed
TwitterPNG JPG GIF5MB
Recommended - need to keep the Width*Height - 1280 x1080
4 Image(s)Not Allowed
Tiktok---- 
GMB
PNG JPG 
5MB
Must be greater than Width*Height - 720*720

Maximum
Width*Height - 3000*3000
1 Image
Not Allowed
 

        1. Instagram Story
  • Image Format-JPEG
  • Image size-8MB
  • Count-10 image(s) or video(s)
  • Video Format-MOV/MP4
  • Video Size-100MB
  • Video Duration- min 3sec max 30 sec
  • Video width-1920 px

    2. Instagram Reels

  • Video Format-MOV/MP4
  • Video Size-1GB
  • Video Duration- min 3 sec max 15 Minutes
  • Video width-1920 px
  • Video Thumbnail format- all
  • Video Thumbnail size-8MB

    3. Facebook Reels 
  • Video Format-MOV/MP4/webM
  • Video Size-1GB
  • Video Duration- min 3 sec max 90 sec
  • Video width-1080 * 1920 pixels (recommended)
    Minimum is 540 x 960 pixels
  • Video Thumbnail format- Thumbnail support is not available for Facebook Reels
  • Aspect Ratio - 9:16


Notes
1) Multimedia format - Posting Image(s) and Video(s) together in a single post 
2) As you experiment with different kinds of images, only then you'll realize which works best     for your brand. By default, these two sizes are impeccable
Horizonatal (landscape): 1,024 pixel X 512 pixel
Vertical (portrait): 800 pixel x 1,200 pixel


Video


Format
Maximum File Size
Duration
Aspect Ratio
No. of Video
MultiMedia
Pinterest
MP4 MOV WEBM
1 GB4 sec - 5 minsAspect Ratio: 9:16 (full-bleed videos), 1:2, 2:3, 3:4, 4:5, or 1:1

Video Encoding: H.264 or H.265 
1 VideoNot Allowed
Facebook Pages 
MP4  MOV
1 GB
1 sec - 20 mins
Between 16:9 and 9:16
1 Video
Not Allowed
Instagram
Business Profile
MP4 MOV
100 MB
3 sec - 60 sec
Between 4:5 and 16:9

Video Width - upto 1920 px
10 Video(s)
Multimedia format is allowed for carousal- can add image(s) and video(s) together
Linkedin Profile and Pages
MP4  MOV
200 MB
3 sec - 30 mins
Between 1:2.4 and 2.4:1
1 Video
Not Allowed
TwitterMP4  MOV
512 MB
0.5 sec - 140 sec
Between 1:3 and 3:1
1 Video
Multimedia format is allowed
TiktokMP4 MOV WEBM1 GB3sec - 180 sec540 pixel resolution

Minimum height 360 px and Maximum height 4096 px
1 VideoNot Allowed
GMB
-
-
-
-
-
Not Allowed

Content Length - 

 Content Length
Pinterest500 character and title 100 character
Facebook Pages 
62000 character
Instagram
Business Profile

Reel 

Story
2200 character

2200 character

character
Linkedin Profile and Pages
3000 character
Twitter280 character
Tiktok Personal

Tiktok Business
150 character

2200 character
GMP
1500 character

Current Rate Limits based on platforms per active user:

  • Google - 300/min
  • Facebook - 200/hr
  • Instagram - 200/hr
  • TikTok - 15/day
  • Twitter - 100/hr
  • LinkedIn - 150/day
  • Pinterest - 100 pins/min

OG Meta Tag is available in all platforms except Instagram, Tiktok and Youtube


Surveys, Forms & Chat (Lead Capture)

WebChat Widget

Are you looking for an easy way to connect with your website visitors and convert them into customers? LeadConnector Webchat for Weebly is the perfect solution for you!

In this article, we'll walk you through the steps to start with LeadConnector Webchat for Weebly.

Covered in the article

How to obtain the embed code for web chat for the website: 
Here are detailed steps on how to add a custom chat widget to a Weebly website using different methods:

Method 1: Adding a Custom Chat Widget with Weebly's Header Code Injection Feature

Method 2: Adding a Custom Chat Widget with Weebly's Custom HTML/ Embed Code Element


How to obtain the embed code for web chat for the website:

Copy the embed code from Sites > Chat Widget > Get Code

Here are detailed steps on how to add a custom chat widget to a Weebly website using different methods:


Method 1: Adding a Custom Chat Widget with Weebly's Header Code Injection Feature

  • Log in to your Weebly account and navigate to the website editor.
  • Click on "Settings" 
  • In the left-hand menu and select "SEO" from the options.
  • Scroll to the "Header Code Injection" section and click "Edit".
  • Paste the code into the "Header Code Injection" box in Weebly.
  • Click "Save" to save your changes.


Method 2: Adding a Custom Chat Widget with Weebly's Custom HTML/ Embed Code Element

  • Log in to your Weebly account and navigate to the website editor.
  • Click on "Elements" in the left-hand menu and select "Custom HTML/Embed Code" from the options.
  • Drag and drop the Custom HTML element onto your page where you want the chat widget to appear.
  • Paste the Chat code into the Custom HTML element in Weebly.
  • Click "Publish" to save your changes.

Are you looking for an easy way to connect with your website visitors and convert them into customers? LeadConnector Webchat for Squarespace is the perfect solution for you!

In this article, we'll walk you through the steps to start with LeadConnector Webchat for Squarespace.


Covered in this Article:

How to obtain the embed code for web chat for the website:

Here are detailed steps on how to add a custom chat widget to a Squarespace website using different methods:


How to obtain the embed code for web chat for the website:

Copy the embed code from Sites > Chat Widget > Get Code.


Here are detailed steps on how to add a custom chat widget to a Squarespace website using different methods:

Method 1: Add a custom chat widget using Code Injection

  • Obtain code for the Chat widget as shown above.
  • Log in to your Squarespace account and navigate to the website to which you want to add the chat widget.
  • Click on "Settings" in the main menu. 
  • Select "Developer Tools" in the "Website" section.
  • Click on "Code Injection"
  • Paste the chat widget code in the "Header" or "Footer" fields.
  • Click on "Save" to save the changes.
  • Preview your website to make sure the chat widget appears correctly.


Method 2: Add a custom chat widget using an Embed Block

  • Log in to your Squarespace account and navigate to the page where you want to add the chat widget.

  • Click on the page editor and select the section where you want to add the chat widget.
  • Click on the plus icon to add a new content block and select "Embed" from the drop-down menu.
  • Paste the chat widget code in the "Code Snippet" field.
  • Click on "Apply" to apply the changes.
  • Preview your website to make sure the chat widget appears correctly.

Are you looking for an easy way to connect with your website visitors and convert them into customers? Webchat for LeadConnector is the perfect solution for you!

In this article, we'll walk you through the steps to start with LeadConnector Webchat for Wix.

Covered in this article:

How to obtain the embed code for web chat for the website:

Here are detailed steps on how to add a custom chat widget to a Wix website using different methods


How to obtain the embed code for web chat for the website:

Copy the embed code from Sites > Chat Widget > Get Code


Here are detailed steps on how to add a custom chat widget to a Wix website using different methods:


Method 1: 

  • Log in to your Wix account and navigate to the website's dashboard.
  • Click "Settings" in the left menu, then select "Custom Code" under the "Advanced" tab.


  • Click "Add Custom Code" in the section.

  • Paste the code snippet in "Code Settings" within the pop-up window.

  • Configure options:
    • Name: Enter a name for your code
    • Add Code to Pages: Choose "All Pages" and select "Load code once."
    • Place Code In: Choose "Head"

  • Click "Apply" to save changes.
  • The widget will now appear on every page of your Wix site.


Method 2:

  • Sign in to your Wix account and launch Wix Editor. Click Edit Site from the Dashboard.


  • Click the plus (+) icon in the left-side menu to access "Add Elements."
  • Choose "Embed" from the left sidebar menu.
  • Select "Embed HTML" under "Popular Embeds".


  • Click on "Code" in the new HTML box that appears.
  • Paste the widget code into the text field and press "Update."

  • Close the "HTML Settings" box.
  • The widget will now be visible in the HTML box on your page.

Are you looking for an easy way to connect with your website visitors and convert them into customers? LeadConnector Webchat for Duda is the perfect solution for you!

In this article, we'll walk you through the steps to start with LeadConnector Webchat for Duda.

Covered in this article:

How to obtain the embed code for web chat for the website:

Here are detailed steps on how to add a custom chat widget to a Duda website using different methods:


How to obtain the embed code for web chat for the website:

Copy the embed code from Sites > Chat Widget Get Code


Here are detailed steps on how to add a custom chat widget to a Duda website using different methods:


Method 1:

  • Log in to your Duda account: Log in to your Duda dashboard and open your website’s editor mode.
  • Edit the site: Navigate to the site you want to add the chat widget and click the "Edit Site" button.
  • In the left column, click on Settings. 
  • Then, click on Head HTML.
  • Paste the embed code: Paste the chat widget's embed code into the editor.
  • Save the changes: Click on the "Save" button to save your changes.
  • Preview the chat widget: Preview your site to ensure the widget appears in the correct location and works as expected.


Method 2:

You can also add the chat widget using an HTML element In the editor. 
  • Add an HTML element: In the editor, drag and drop an HTML element onto the page where you want the chat widget to appear.
  • Open the HTML editor: Double-click on the HTML element you just added to open the HTML editor.
  • Paste the embed code: Paste the embed code for your chat widget into the HTML editor.
  • Save the changes: Click on the "Save" button to save your changes.

Are you looking for an easy way to connect with your website visitors and convert them into customers? LeadConnector Webchat for Shopify is the perfect solution for you!

In this article, we'll walk you through the steps to start with LeadConnector Webchat for Shopify.


How to obtain the embed code for web chat for the website:

Copy the embed code from Sites > Chat Widget Get Code


Here are detailed steps on how to add a custom chat widget to a Shopify website using different methods:

  • Log in to your Shopify account: Go to your Shopify account and log in.
  • Navigate to the "Online Store" section: From your Shopify dashboard, navigate to the "Online Store" section.
  • Edit your website's theme: Select the theme you want to edit and click the "Actions" button. Choose "Edit code" from the drop-down menu.
  • Open your theme's theme.liquid file: In the list of files that appears, select the "Layout" folder and then select the "theme.liquid" file.
  • Paste the embed code: Locate </body> tag within theme.liquid then add embed code above it.
  • Save the changes: After adding the embed code, hit the save button.
  • Preview the chat widget: Go to your website and refresh the page. The chat widget should now be visible on your website.
  • Please test it out to make sure it's working correctly

Pipelines & Opportunities

Opportunities

The Custom Fields for Opportunities feature empowers users to capture, organize, and customize information tailored to their needs, transforming opportunities into fully personalized processes. Users can create, categorize, and group custom fields within the Opportunity Modal, refining their data management and process tracking. With the same ease of customization as with contacts

This feature is currently accessible in Labs.

Covered in this Article

What is this feature?

Usage Cases:


How to use this feature?


FAQs

How can I see my custom fields in an Opportunity?

What does the 'hide empty fields' feature do?


What is this feature?

The Custom Fields for Opportunities feature enables businesses to add, customize, and organize specific data fields for their sales opportunities.

This provides greater flexibility and precision in tracking potential sales or tasks. It allows businesses to include additional data points unique to their operations or sales processes. These custom fields can range from project deadlines product specifications, client preferences, etc.

Furthermore, this feature allows businesses to categorize these custom fields into various folders, creating a more organized and streamlined view. There's also an option to hide empty fields, ensuring a clean and efficient visual of opportunity cards.

Usage Cases:

Sales Deadlines: You can create a custom field for each opportunity's sales closing date to ensure your team knows all critical deadlines.

Sales Stages: Differentiate between various sales stages for an opportunity, such as initial contact, needs assessment, negotiation, or final closing.

Product Details: Use custom fields to track specific product or service details related to an opportunity, such as product model, SKU, or service type.

Client Preferences: Track specific preferences or needs of a client, such as preferred contact time or any particular requirements or requests they may have.

Lead Source: Keep track of where your leads are coming from. This could include referrals, social media, direct mail, etc.

Customer's Budget: To cater to your offers more precisely, having a field for the client's budget or expenditure capability would be helpful.

Likelihood of Conversion: Create a field to indicate the probability of an opportunity turning into a successful sale. This can help prioritize resource allocation. This could be a number field modified using a Math Operation workflow action to update the field.

Next Follow-Up Date: To keep the conversation going and increase the chances of a sale, you might want to track when you should follow up with a potential client.

Associated Campaigns: If your opportunities are tied to specific marketing campaigns, you can create a custom field to track which campaign each opportunity is associated with.

Client's Industry or Occupation: Having a field for the client's industry or occupation can help you understand their needs better and tailor your communications accordingly.


How to use this feature?

Go to Settings: The settings for creating custom fields can be found on the settings page of your sub-account.

Create Custom Fields: Navigate to 'Custom Fields' under settings. Click on 'Add Field' or 'Create Field'.


Define Your Fields: Choose 'Opportunity' as your object and then define your custom field type, such as single-line text, number, dropdown, etc. Give it a name that suits its purpose, like 'Project Start Date' or 'Sales Stage'.

The types of custom fields you can add for opportunities currently include:

  • Text Input
  • Single Line
  • Multi-Line
  • Text Box List
  • Values
  • Number
  • Phone
  • Monetary
  • Choosing Options
  • Dropdown (Single)
  • Dropdown (Multiple)
  • Radio Select
  • Checkbox
  • Date Picker
  • Signature


    Please Note
Although typically available, the 'File Upload' field type is currently being worked on to be made available for opportunities. This will enable you to upload files directly to your custom fields in the opportunities section. 


Now you should see an option called 'Opportunities' and 'Contacts'. After filling in the necessary information, Choose Opportunities and hit Save.


Create Custom Folders: You can group your custom fields for opportunities into custom folders. This helps you categorize and organize your fields better. To do this, go to 'Folders' in the 'Custom Fields' section, create a new folder, give it a name, and select 'Opportunity' as its object.

Use Your Custom Fields: When you go to the 'Opportunities' section when creating or editing an opportunity, you will see these new custom fields. You can fill in the information as needed.

Hide Empty Fields: If you have a lot of custom fields and don't want to see the ones that don't have any value, you can turn on the 'Hide Empty Fields' feature.


FAQs

How can I see my custom fields in an Opportunity?

When you go to 'Opportunities' and select or create an opportunity, you'll see your custom fields listed. When you edit an opportunity, these fields are available for input. If you've organized your fields into folders, these will appear one after the other.

What does the 'hide empty fields' feature do?

When enabled, the 'hide empty fields' feature hides all fields that currently have no value. This allows you to focus only on fields that are relevant or required for you, providing a cleaner, more streamlined view of your opportunity data.

With this new feature, you can now have separate owners for contacts and opportunities in your system. This flexibility allows for more nuanced management and delegation of responsibilities within your organization.

TABLE OF CONTENTS

Enabling the Feature

To enable this feature, follow these steps:

  1. Navigate to Settings.
  2. Find the "Allow different owners for contacts and its opportunities" option.
  3. Toggle the setting to "On."

Functionality

Both contacts and opportunities can have different owners once the toggle has been turned on.

Default Opportunity Owner: When creating a new opportunity, the default owner will be the same as the contact owner. However, this can be updated as needed to reflect the appropriate ownership.

Workflow Action (Coming Soon): Stay tuned for an upcoming workflow action that will enable further customization and automation with this feature.

Subsettings: There are two additional subsettings available -

  • Allow updating the contact follower based on the opportunity owner change: Enable this setting to automatically update the contact follower when the opportunity owner is changed.
  • Allow updating the opportunity follower based on the contact owner change: Enable this setting to automatically update the opportunity follower when the contact owner is changed.

How It Helps

  • Improved Customization: Tailor ownership settings to match your organization's specific structure and workflows.
  • Efficient Communication: Automatically update followers based on ownership changes, ensuring seamless communication and collaboration.

With the ability to decouple owners for contacts and opportunities, you have greater control and flexibility in managing your CRM.

Importing files into our system is straightforward if you follow the guidelines and steps outlined below. This document will help you ensure a smooth and successful import process.

Sample File for importing or updating opportunities: Sample file

In This Article


Prepare Your Data

Supported File Types

  1. Ensure your file is in .csv format.

File Preparation Requirements

  1. Sheet: Only one
  2. Size: Smaller than 30 MB
  3. Headers: Include a header row with at least one column corresponding to a field in the system
Please note that Opportunity import is not a reversible action

Mandatory Fields

1. For Creating Opportunities: Contact ID, Opportunity name and Pipeline ID. 

  • Default values:
    • If the Stage ID is absent, it defaults to the first stage under that pipeline. 
    • If the Opportunity Value is absent, it defaults to 0. 
    • If the Opportunity status is absent, it defaults to “Open”.
    • If the Opportunity lost reason is added and is valid, the Opportunity Status will be updated to "Lost"
Opportunity ID, Pipeline ID and Stage ID can be fetched by exporting opportunities
Contact ID can be fetched by exporting contacts

2. For Updating Opportunities: Opportunity ID (can be fetched by exporting opportunities)

Understanding Import Options

When importing objects, you have three options to choose from:

  1. Create Opportunities: Use this option to upload only new records into the system.
  2. Update Opportunities: Select this option to update information for existing records.
  3. Create and Update OpportunitiesChoose this option for a combination of adding new records and updating existing ones.
 

Structuring Your File

Field Formatting

  • Date Picker:
    • Acceptable formats: mm/dd/yyyy (e.g., 10/28/2020), yyyy/mm/dd (e.g., 2020/10/28), mm-dd-yyyy (e.g., 10-28-2020), yyyy-mm-dd (e.g., 2020-10-28).
  • Multiple Options, Checkbox, Textbox List:
    • Acceptable formats: Value 1, Value 2, Value 3 (e.g., Blue, Yellow, Green). You can also use ; or . as separators.
  • Radio, Single Option:
    • Acceptable formats: Value 1 (e.g., Blue).
  • Opportunity Owner:
    • Format: FirstName LastName (e.g., Logan Paul).
  • Tags:
    • Acceptable formats: Value 1, Value 2, Value 3 (e.g., Blue, Yellow, Green). You can also use ; or . as separators.
  • Phone Number:
    • Format in E.164 (e.g., +1 1234567890). For US numbers, formats like 123-456-7890 or (123) 456-7890 are also acceptable.
  • Numerical:
    • Acceptable formats: 1.23, 1234, .123.
  • Monetary:
    • Acceptable formats: 1234, 1,234,234.33.
  • Opportunity Followers:
    • Acceptable format: FirstName LastName, FirstName2 LastName2 (e.g. Adam Smith, David Lee)


Importing Your File

Steps to Import:

  1. Turn on Opportunities Import under "Labs" > Subaccounts
  2. Go to Opportunities
  3. On the top right under 3 dots, click on "Import Opportunities"
  4. Upload Your File: Click the 'Import' button and upload your file. Also select whether you would like to "Create", "Update" or "Create and Update"

  5. Map Your Fields: Ensure each column in your file is correctly mapped to the corresponding field in the system. Adjust the mappings if necessary.
    A few things to note:
    1. Checking the "Don't update Empty Values" checkbox will not update any field if the imported file has empty values and the field does have some value for the opportunity
    2. If you decide to not import certain field, you can choose to keep it unmapped and check the box on the bottom to proceed. -"Please ensure all mandatory fields are mapped. To proceed, either map all fields or choose Don't import data for unmapped columns"

6. Review and Confirm: Review the data preview to ensure everything looks correct. Confirm the import to proceed. Note that it is mandatory to check the box on the bottom and accept the disclaimer to start importing.
You can also add tags to the corresponding contacts for these opportunities on this screen.

7. Monitor the Import: Check the import progress under Opportunities > Bulk Actions. If any errors occur, refer to the error messages provided for guidance on fixing them.

8. Monitor stats, errors and warnings by clicking on the "Show Stats" button for any import.

Troubleshooting Common Errors

  • Error: Invalid option selected for multiselect or dropdown field
    Solution: Check your import file for incorrect values in multiselect or dropdown fields by comparing them with the options in the system. Update the value in your file to match an existing option or add it as a custom option in the system. Then re-import the file.
  • Error: Invalid Contact ID
    Solution: Verify that the Contact ID exists in the system or remove the ID if not updating an existing contact.
  • Error: Could Not Parse Date
    Solution: Ensure date fields are in one of the acceptable formats: mm/dd/yyyy, yyyy/mm/dd, mm-dd-yyyy, yyyy-mm-dd.
  • Error: Duplicate Unique Property Value
    Solution: Ensure there are no duplicate values in fields marked as unique, such as emails or IDs.
  • Error: File Not Found
    Solution: Verify that your file is the correct type and format. Re-upload the file.
  • Error: Required Fields Missing
    Solution: Ensure all mandatory fields (e.g., Opportunity Name for opportunities, Email/Phone/Name for contacts) are included and correctly formatted.

Additional Tips

  • Double-check your file before importing to avoid errors.
  • If you encounter any issues during the import process, refer back to this guide or reach out to our support team for assistance.
Scroll to Top